Create and manage review rules for Document Processes

Use the Review Matrix to create rules and manage who is involved in review processes.

Erforderliche Berechtigungen
Create/edit review matrix

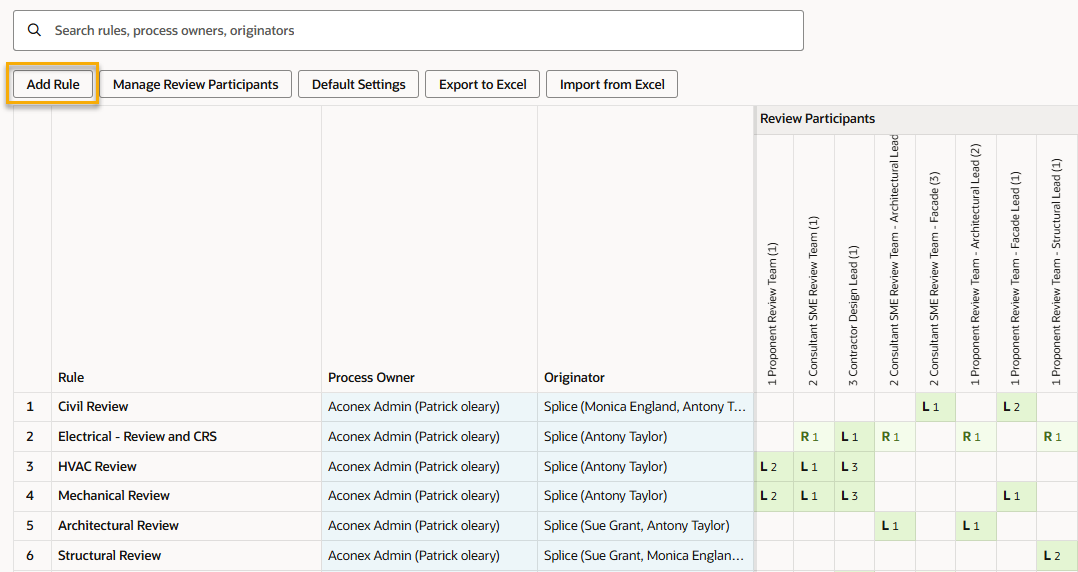
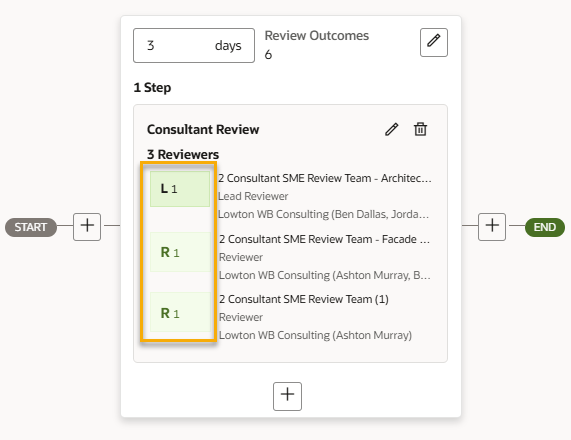
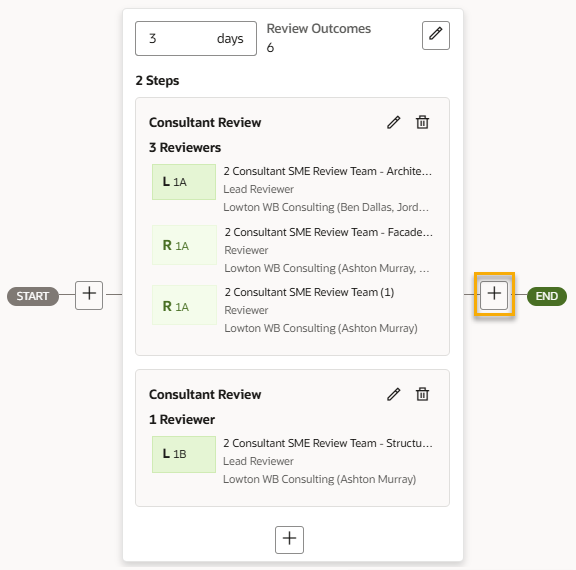
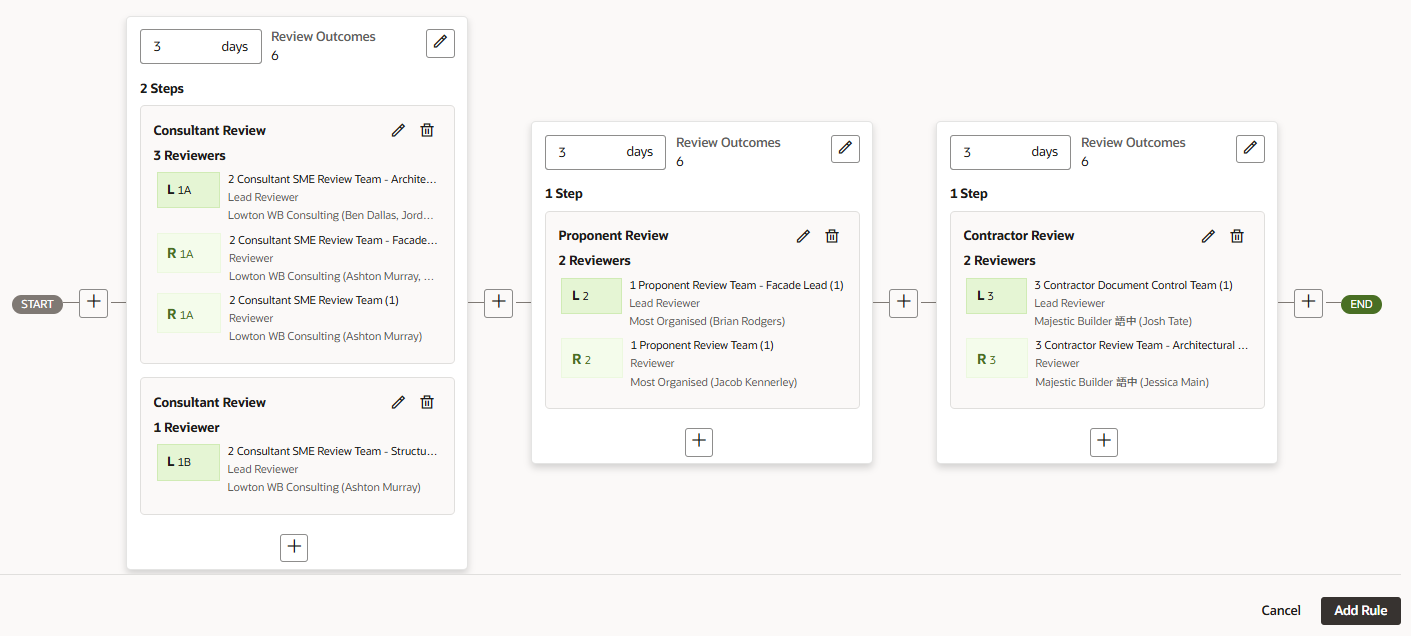
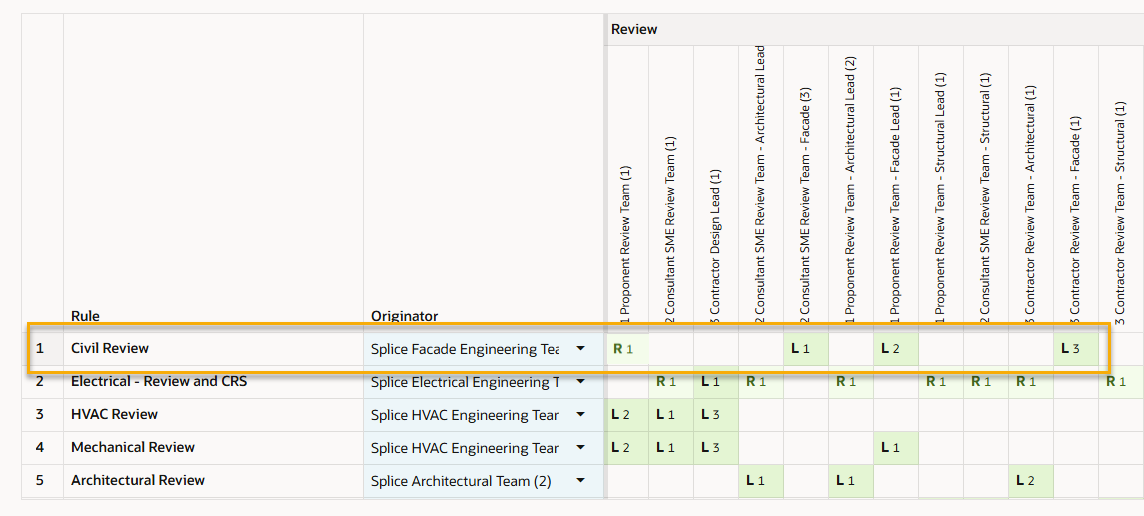
The Review Matrix is a collection of rules that determine which documents need to be reviewed and by whom, based on document metadata. Rules can be created and updated directly from the matrix, or you can use the visual process builder. If you've previously used Workflows this is similar to creating a workflow template where you add steps and reviewers. 

When a review is started, each document is automatically sent to the reviewers by matching document metadata (such as type or discipline) against the rules configured in the Review Matrix. Once you have lots of processes established, the Review Matrix saves you time if you need to change or modify them in bulk. 

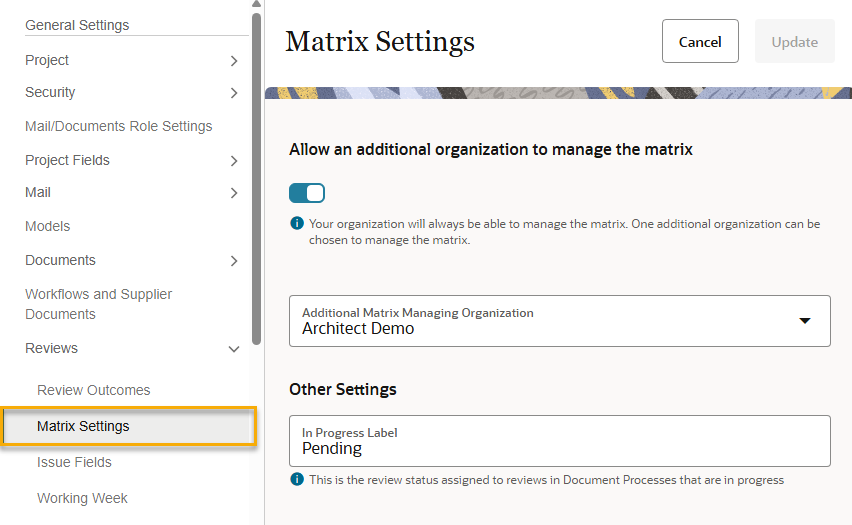
The project-owning organization configures review processes in the Review Matrix. They can also allow an additional organization to configure the Review Matrix.

Before you begin, make sure your project is ready for Document Processes. Follow these steps to set up your project for Document Processes.

Hinweis

Document Processes is currently only available to projects on the KSA1 and MEA Aconex instances. We'll continue to develop features based on feedback and announce availability for other Aconex instances at a later date. Make sure you subscribe to Release Highlights to be notified.

Open the Review Matrix

  1. Click Document Processes from the main navigation menu and select Review Matrix.
  2. Here you'll find: 
  • A list of all review rules on the project. If you've previously used Workflows, you can think of these as your review templates but with greater flexibility.
  • The process owner for each rule. This is the person responsible for managing the review with the ability to skip steps, add reviewers, terminate a review, and assign issues. 
  • The originators for each rule. These are the people that are automatically assigned issues.
  • How many steps and stages are in the review process associated with each rule. 
  • The lead reviewers and reviewers participating in each step of each review.

Hinweis

Only a Lead Reviewer can select a review outcome to complete a step.  Learn more about the different roles in Document Processes.

Configure default settings

  1. Click Default Settings to view and modify the default behavior for new rules.
  • Step duration: The default number of days for each step of a review.
  • Issues visible across parallel steps: Allows reviewers in a parallel step to see issues raised by other parallel reviewers in the same stage. Note: They will see each others issues after the step is completed regardless of this setting.
  • Allow initiators to modify the process of a review when starting it: This setting allows initiators to modify the process of a review when starting it.
  • Default process owner: This is the person responsible for managing the review with the ability to skip steps, add reviewers, terminate a review, and assign issues.
  • Default originators: They are the suppliers of the document. By default they will be assigned issues from the review.

Hinweis

If no rules have been configured, you'll be taken through a guided process to configure the default settings when you first access the Review Matrix.

Add reviewer groups

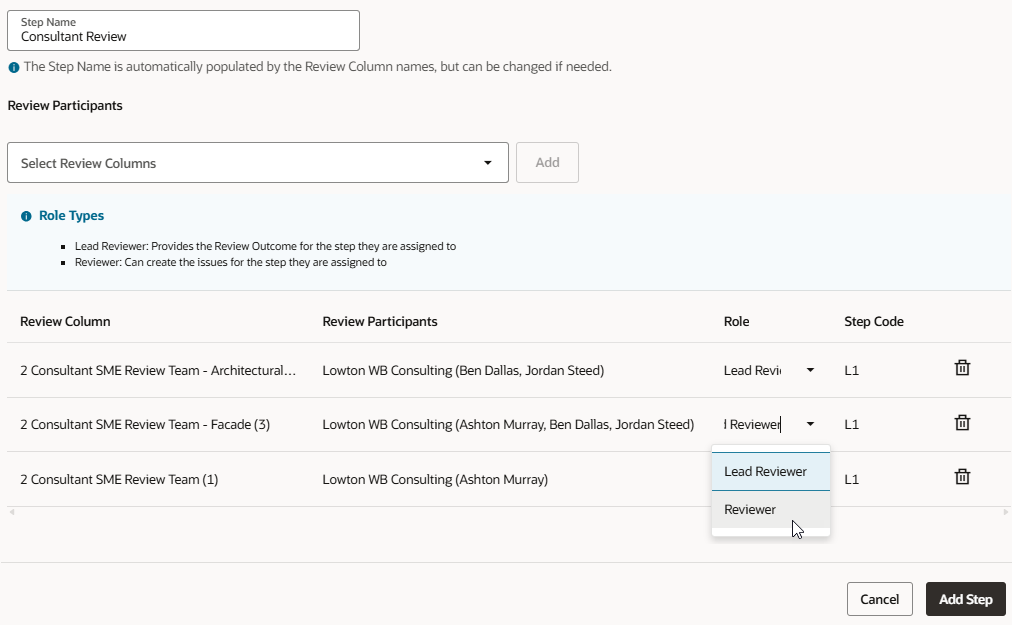
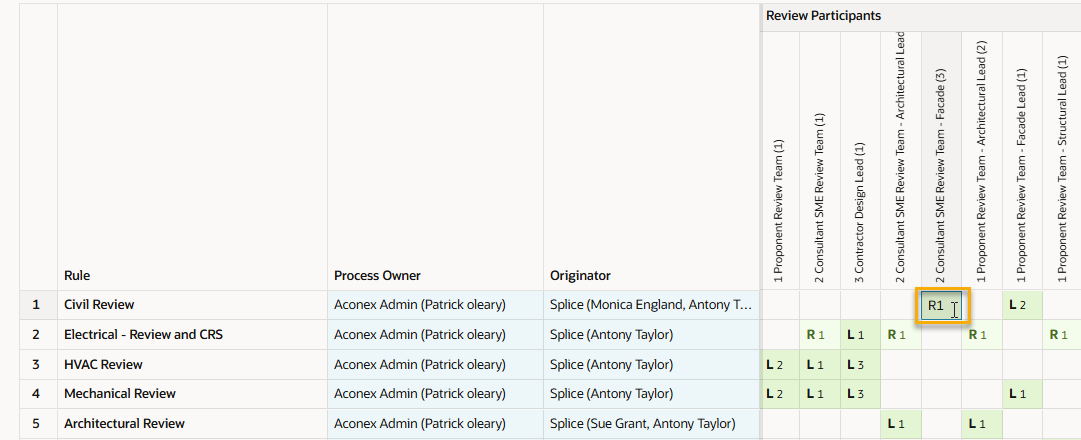
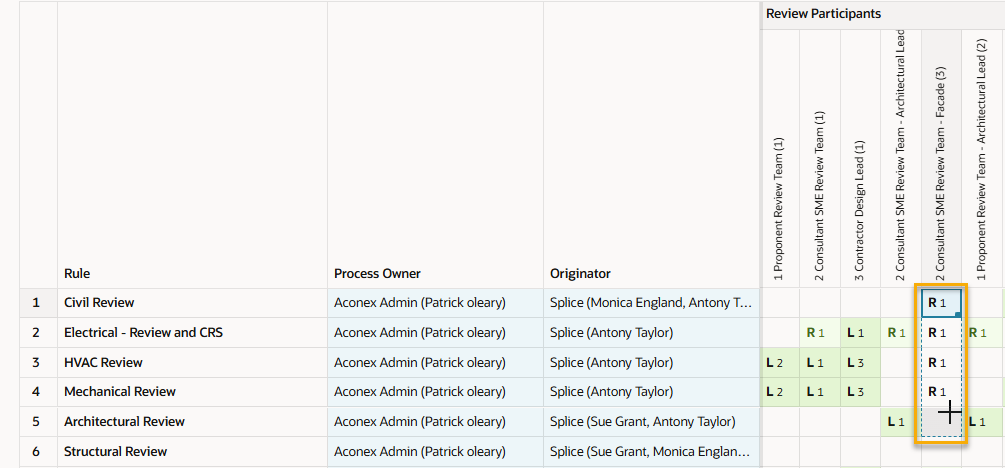
A reviewer group is a collection of review participants that perform a particular function or role during reviews. For example you may have a group for the Mechanical Lead, and another for Document Control. The groups are displayed in the columns of the Review Matrix.

  1. Click Manage Review Participants. You'll see a list all groups and their participants that have been created for the project. 
  2. To create a new reviewer group click Add Review Column.
  3. Give the group a name and choose the reviewers for the group. 
  4. Click Add.

Add or remove users from reviewer groups

  1. Click Manage Review Participants
  2. Click Add Participants.
  3. Select the user you want to add, then select the groups you want to add them to.
  4. Click Add.

Hinweis

The process to remove a user from multiple groups is the same, after clicking Remove Participants. You can also export the list of participants to Excel.

Create a review rule

  1. Click Add Rule.
  1. Enter the details of the rule:
  • Give the rule a unique name and optional description. 
  • Assign a rule ranking. When starting a review, if a document matches multiple rules, the system uses this ranking to decide which rule to apply. The highest ranking rule applies (where 1 is the highest). Each time you create a new rule, the rule ranking defaults to the next available number (in this case the next number would be 2). You can change the priority of each rule by setting its rule ranking.
  • Select the process owner. This is the person responsible for managing the review with the ability to skip steps, add reviewers, terminate a review, and assign issues. 
  • Select the originators. They are the suppliers of the document. By default they will be assigned issues from the review.
  • Tick the box if you want issues to be automatically assigned to the originators when the review is completed. The auto-assignment option will notify the originator that they have actions in their document to respond to. Unchecking this option will require the process owner to manually assign all issues.
  • Enable Complete review on a negative outcome if you want the review to end when a negative outcome is provided on a step.
  • Choose the review outcome set from the select list.
  1. Click Continue.
  1. Define the filter criteria for documents that will be matched to this rule when they are selected for review. 

    For example if you want the rule to apply to all Civil documents put into a review, choose the Civil discipline. You can test the filters to see which documents currently fit your criteria. Keep in mind that as you add more documents to your register there may be more documents that match against this rule.
  1. Click Continue to define the review process. This is where you'll set the stages, steps and reviewers for the rule. The first stage has been created for you.

    You can:
  • Change the number of days or leave it as the default setting.
  • Click the pencil icon to change the available outcomes for the stage.
  1. Click the plus button to add a step to the first stage of the review.
  1. Give the step a name.
  2. Select the reviewer group(s) for the step and click Add.
  3. By default, each group will be set as a Lead Reviewer. This means they can provide a review outcome to complete the step. You can change them to a reviewer if you want them to review the document but not provide an outcome. Learn more about the different roles in Document Processes.
  4. Click Add step.
  1. You'll see step codes displayed for each review group. These codes are handy when viewing and updating rules directly in the Review Matrix. 

    In this example the code L1 is shorthand text for the Lead Reviewer of step 1. While R1 is shorthand for Reviewer of step 1.
  1. To add a parallel step to the same stage, click the plus button again. Note: The codes for parallel steps have an extra letter to indicate it's a parallel review.
  1. If you click the pencil icon for a stage that has a parallel steps you'll see the Issues Visible option to turn issue visibility off or on. If enabled, the parallel reviewers will be able to see each others issues.

Hinweis

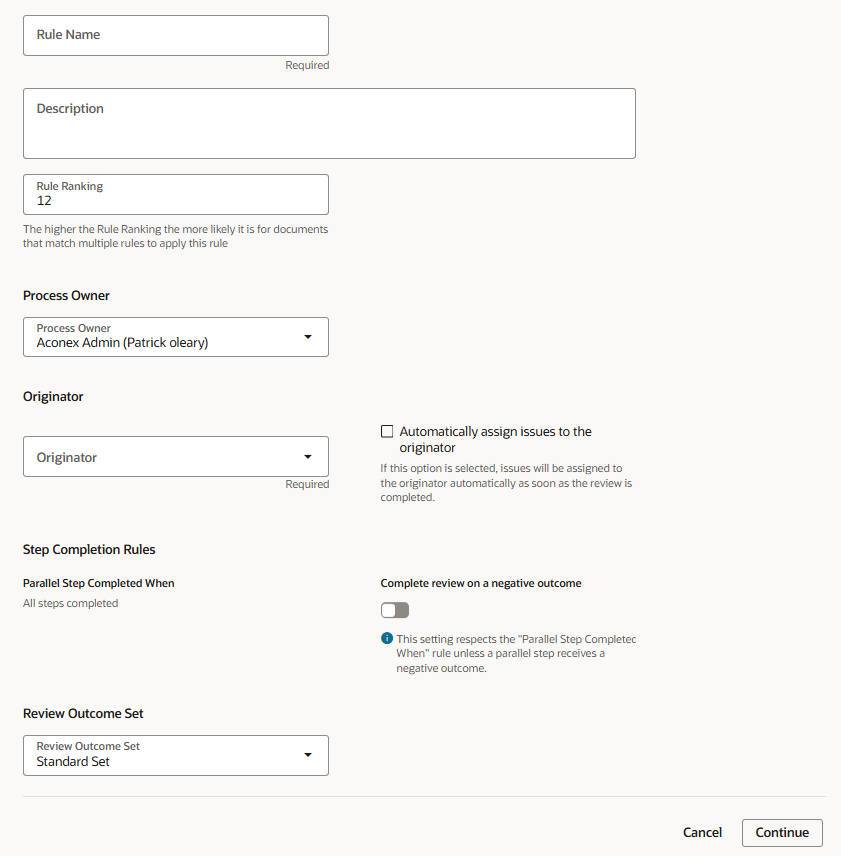
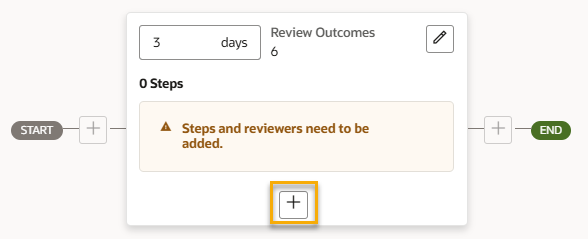
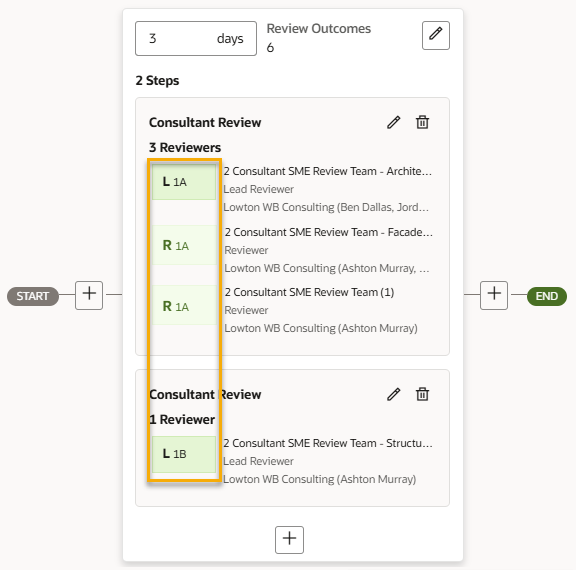
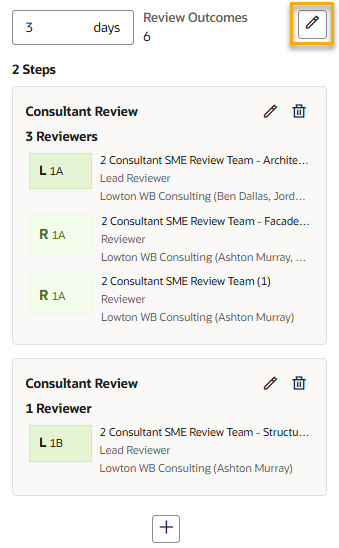
Avoid parallel reviews in the last step. We recommend the last stage of your review only contains a single step. This allows the Lead Reviewer to submit a final outcome for the review.

If the last stage of your review contains parallel steps, the final review outcome will either be negative or blank. On rejection, the review ends early without the other parallel reviewers providing their feedback.

  1. Once all steps are added, click the plus button on the right to add the next stage of the review process.
  1. Follow the previous instructions above to add the required steps to the stage. 
  2. Continue adding stages, steps and reviewers as required, making sure each stage has the required duration, outcomes and parallel step issue visibility. 
  3. Click Add Rule when you're finished.
  1. Your rule is added to the Review Matrix. The shorthand codes are displayed for quick reference, so you know who is involved in each stage of each review process.

Update processes from the grid

  1. You can click on a cell in the grid to make changes. For example, to change a reviewer of the first step to a lead reviewer you can change R1 to L1. Make sure you click Update to save your changes.
  1. To make changes in bulk you can click and drag a cell to copy the contents across to other cells. This is helpful for example, if you need to add reviewers to multiple rules. Make sure you click Update to save your changes.
  1. If you need to update lots of rules you can export the rules to Excel, then reimport them with your changes.
  1. You can click the three dots menu for a rule and use the visual editor to make changes.

Review Matrix project settings

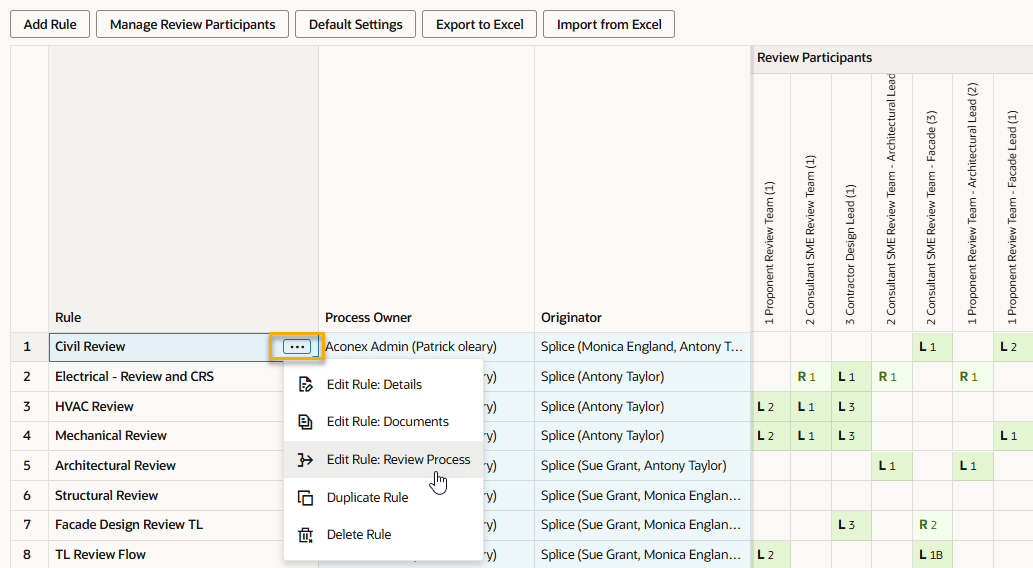
The Project Admin from the Aconex project-owning organization can configure the review matrix settings.

  1. From the main navigation menu click Setup and select Project Settings.
  2. Click Reviews and select Matrix Settings.
  3. From here you can:
  • Choose an additional organization to manage and create rules in the Review Matrix.
  • Set a custom review status assigned to reviews that are in progress

4.  Click Update after making your changes.