Importing Data in Cost

If you have large amounts of data to add to Cost, you can save time doing this by importing it via a CSV files.

You can import data into Cost using CSV files, instead of manually typing all the information. Each import has a specific template, which is available in the module.

You can import data through a CSV file upload. This provides an option to populate a project more quickly when there is a large amount of project data.

If the data you would like to import is only a few lines long, we suggest you manually enter data as this will often be quicker than importing.

General process overview

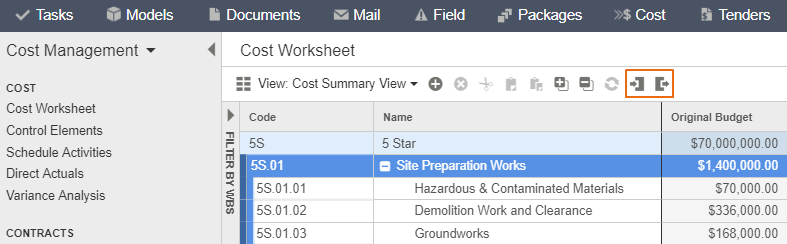
You can import and export Cost data using the Import and Export buttons at the top of the Cost screen.

  1. Click on the Import icon to open a menu showing the import options available for the current screen.

Tip!

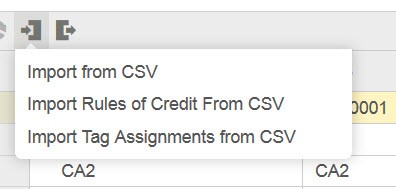
Importing data can be a multi-step process. The drop down is always in order, top to bottom of which import file is required first to last.

  1. Select the appropriate option from the menu to open the Import window.

Tip!

You can use the Download Template button to get a CSV template with the required columns. Alternatively you could export data using Export and use that as a pre-populated template.

  1. Populate the import template file with the data you want to upload. For more information see Cost - minimum data requirements for importing data via CSV files.
  2. Once you’ve created the file, click Browse to select it.
  3. Some imports allow you to remove all existing data from the current grid by selecting Delete all existing records and replace. Only use this if you need to replace all the existing data.
  4. Click Import.
  5. The file will then be uploaded and added to the queue. Most imports take a few seconds, but it could take longer if you’re importing large amounts of data.
  6. You can see how the process is running as its status is shown in the right corner of the screen.

Troubleshooting Failed Import Files

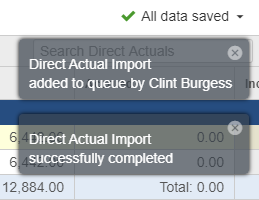
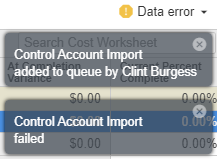
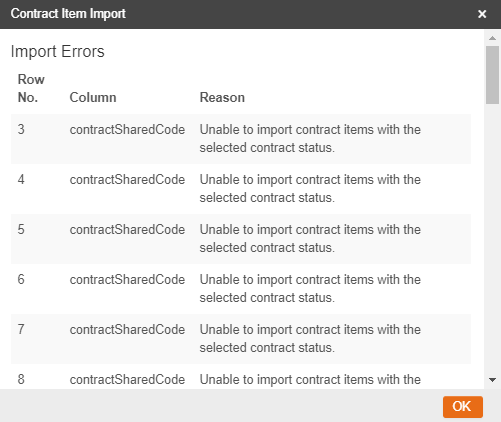
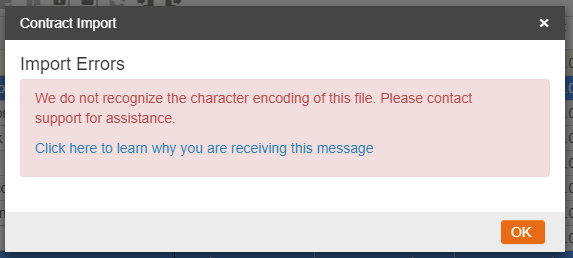
If there is an issue with import file you will see an error message in the top right hand corner of Cost. 

  1. Click the Data error drop down in the top right corner, and then the magnifying glass next to the failed import message.
  1. The Import Error window shows why the import failed, usually for each row of the import file that had errors. For example:
  • Row No – this refers to the row in the CSV import file.
  • Column – this refers to the column title (reference is to the second row on Import template).
  • Reason – this tells you what is wrong with the referenced row/column.
  • In the example below the import has failed because the contract we are trying to populate has an Approved status. The contract needs to be changed to Preliminary for the import to be successful.
  1. Open the CSV import file and find the cell containing the problem using the row and column references in the Import Errors window.
  2. Correct the data based on the reason described.
  3. Save and retry the import file. Note: You do not have to close the file while you perform the import.
  4. If you receive a generic error that the file could not be imported, there may be a problem with the structure of the file. For more information see Using the Correct File Formats for Importing Cost Data.

Tips and tricks for a successful import

  • If the data you want to import is only a few lines long we suggest you manually enter data as it may be quicker than importing.
  • Required columns must be populated and have no blank cells, as shown in the Minimum Requirements table. Link to 2 Min Requirements Table
  • The import process relies on exact matches of data to form the link between the CSV file and Cost. E.g. if you were importing control elements into control accounts in the Cost Worksheet.
    • The Control Account Code must match exactly the Control Account Code used in Cost.
    • The spelling of the Control Element must match the spelling in the Control Element Category exactly.
  • All dates must use the format: YYYY-MM-DD.
  • If you close and reopen the CSV file in Excel, the date format reverts to the regular date format. You have to change this back to: YYYY-MM-DD. To do this:
    • Highlight the Date column.
    • Right click on the highlighted area.
    • Select the category Custom and enter YYYY-MM-DD.
    • Click OK.
  • When making any changes to an import file you must save the document before reattempting the import process otherwise the changes will not take effect.
  • You can make the import process easier by manually entering the first line of data into Cost, then exporting that and replicating the formatting in the CSV file you’re creating.