Create a contract

Create contracts in Cost in a few steps.

Required permissions
Upstream Contracts: Read, Create, Update, Delete
Downstream Contracts: Read, Create, Update, Delete
Approvals require Contracts: Execute

Upstream or Downstream?

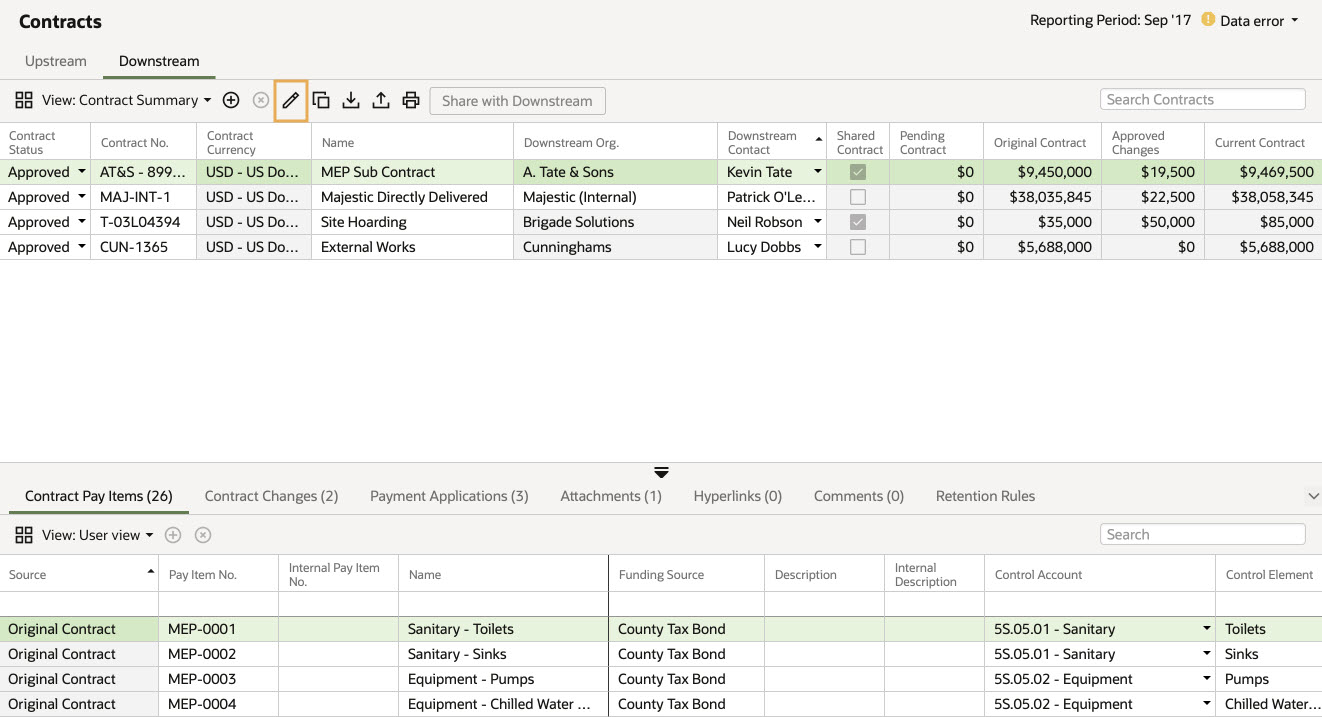
Contracts are created in Cost as either an upstream or downstream contract depending on your organization’s role, and they have slightly different functionality. 

  • Downstream contracts (where your organization is the upstream) are treated as commitments, with payments recorded as costs to your organization. Downstream contracts show on the cost worksheet as commitments with actual costs from payment applications.
  • Upstream contracts (where your organization is the downstream) are treated as a source revenue and can be used to drive project budgets.

The contracts, contract changes, and payment applications pages in Cost are split into upstream and downstream using tabs at the top of the screen.

Creating a Contract

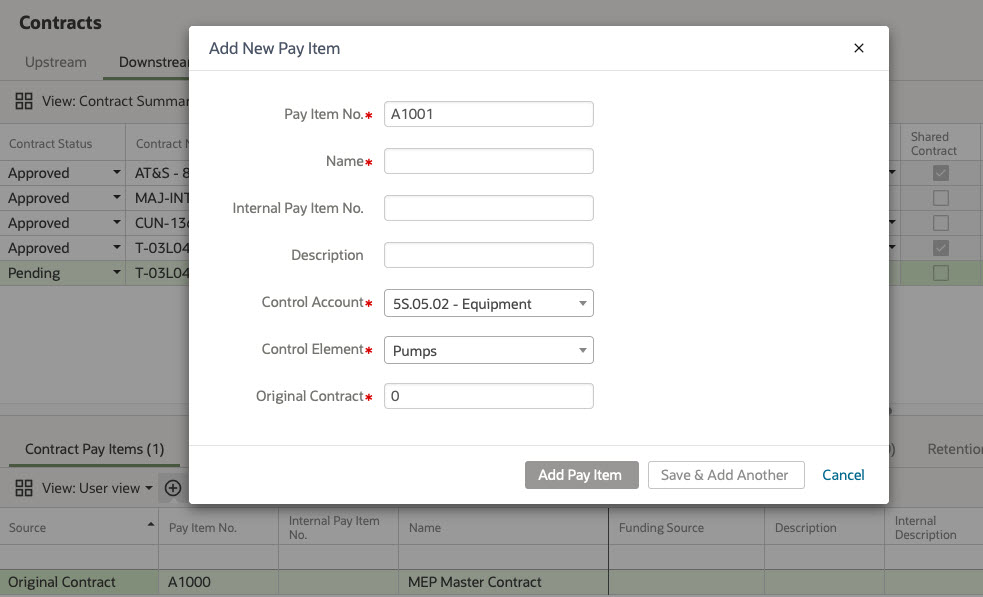
Contracts can be manually added to Cost or imported and always have two levels of data; the main contract record and a breakdown of items.

  1. Start by selecting either the Upstream or Downstream tab on the contract grid.
  2. Click the + icon on the toolbar.
  3. Complete all mandatory fields. Note: if you don't have the Cost Worksheet you will not see the control account and control element options.
  4. Most of the values entered here can be changed later, so don’t worry if you select the wrong currency, status, or default control account and element.
  5. Under 'Downstream Information', you can link the contract to another organization that uses Aconex. You typically do this to share the contract or want consistent reporting using organization names from the Aconex directory. If you’re unsure, leave this as 'Manually enter' and you can select the organization later if you decide to share it. Note: if you select an organization here, it cannot be changed later.
  6. Click Add Contract.
  7. The new contract will be selected. Note: One contract pay item has been added automatically with the value from the dialog. This can be edited or removed later.

Adding Contract Pay Items

Contracts are broken down into multiple contract pay items which form the basis for all payment applications. Pay items can be added or changed after the contract is approved by creating a contract change.

  1. After creating a contract, select it in the main contract grid to highlight it.
  2. On the lower grid, click the + icon on the toolbar to add a pay item.
  3. Complete the details for the pay item. Any values added here can be edited later, as long as the contract is in the pending or proceed status.
  4. When all the details are entered, click Add Pay Item.
  5. Repeat steps 3 and 4 until you have entered all pay items for this contract. Alternatively use an import to populate the data.

Setting up Contract Retention

Contract retention rules are setup for each contract and are used on payment applications to calculate how much should be retained. 

Retention is calculated based on the payment application value, however individual pay items can be excluded from the retention calculations if required.

Contracts support three retention methods:

  • Manual or no retention
  • Single rate retention
  • Dual rate retention

Contracts are created with manual/no retention by default. Follow these steps to change the method.

Note: changing the method on a contract will not update existing payment applications.

  1. Select the contract on the main contracts grid.
  2. On the lower grid, select the retention rules tab.
  3. Select manual, single, or dual as required.
  4. Single retention requires one rate which will be used to calculate retention on all payment application amounts.
  5. Dual retention requires 3 values as explained below.
  6. Enable or disable item exemption if you would like this option.
  7. The selected retention method will apply to all future payment applications.

Dual Retention Rate Settings

A dual retention rate allows you to retain amounts up to a certain payment application value and has three options that need to be configured.

  1. Retention rate of: %
    The first retention rate is applied to all payment application items (except excluded items) while the total value of payment applications is below the threshold set for 'until progress of'. This value is always specified as a percentage and is multiplied against the payment application value to determine the amount to retain.
     
  2. Until progress of: % or currency value
    This threshold can be defined as either a percentage or value (in the contract currency) and is used to determine if the retention rate or the dual retention rate is applied. This threshold is compared against the percent invoiced of the contract if percent is selected, or the total payment application amount if currency value is selected.
     
  3. Dual retention rate: %
    After the threshold, the dual retention rate is applied to the payment application value to calculate retention. This value is always specified as a percentage and is multiplied against the payment application value to determine the amount to retain.

Dual Retention Examples

Example A:
A common use for dual rate retention is for withholding retention on payments at the start of the contract. You may withhold 10% of payments as retention, until the contract is 50% complete, then retain 5%. The retention settings would be setup as follows.

  1. Retention rate of: 10%
  2. Until progress of: 50%
  3. Dual retention rate: 5%


Example B:
Another example is to not withhold any retention until the contract is nearing completion, then retain a large amount of payments. The retention settings would be setup as follows.

  1. Retention rate of: 0%
  2. Until progress of: 70%
  3.  Dual retention rate: 20%


Example C:
A third example used in some regions is to withhold retention up to a specific retention amount, then no further retention will be withheld. If 20% is withheld up to a maximum of $100,000 retained, the progress threshold would be $500,000 (20% retention x $500,000) and the retention rate would be setup as follows.

  1. Retention rate of: 20%
  2. Until progress of: 500,000 currency
  3. Dual retention rate: 0%

Approving a Contract

Once the contract and all pay items have been added, you can change the status of the contract. This allows you to start using contract changes and payment applications. Changing the status also updates the cost worksheet if you’re using it, and the status-based columns like 'approved contract'.
You can revert the status after it’s been approved, however, some logic is applied.

  1. Go to the contract main grid and select the contract.
  2. Find the contract status column and change the status.
     
Contract Status and Logic
  Contract Logic General Logic

Pending – Used while the contract is being drafted

  • Contract and pay items can be edited without restrictions.
  • Contract can be shared to allow the downstream to edit and add items if required.
  • Payment applications and contract changes cannot be created.
  • If payment applications or contract changes exist, the contract cannot be put into this status (use proceed instead).
  • The contract does not show as a current commitment on the cost worksheet or similar columns.
  • The contract value will show in status-based columns such as pending contract and potential estimate at completion.

Proceed – Used when the contract has conditional approval to start work but the contract has not been fully approved.

  • This status is a hybrid between pending and approved.
  • Contract pay items can be edited, but restrictions apply if payment applications or contract changes exist.
  • Payment applications and contract changes can be created.
  • The contract value is displayed in the current contract on the contract grid and cost worksheet.
  • Proceed contracts are treated as approved for most calculations.
  • The contract value will show in status-based columns such as proceed contract.

Approved

  • Some contract details and pay item values cannot be manually edited.
  • Payment applications and contract changes can be created.


Defects & Liabilities

  • The same as Approved but is useful to keep track of contracts that have entered the D&L phase.


Closed – Used when the contract work has been completed and all payments made.

  • The contract is locked preventing edits to the values.
  • Payment applications and contract changes cannot be created.
  • Any remaining to spend value in the contract should be removed with a contract change before closing, otherwise the cost worksheet may report ETC and EAC incorrectly.


Cancelled – Used when the contract was created but will not be executed.

  • The contract is locked and pay item values are reduced to 0.
  • Cancelled cannot be used if payment applications and contract changes exist unless they are withdrawn first.


Sharing a Contract

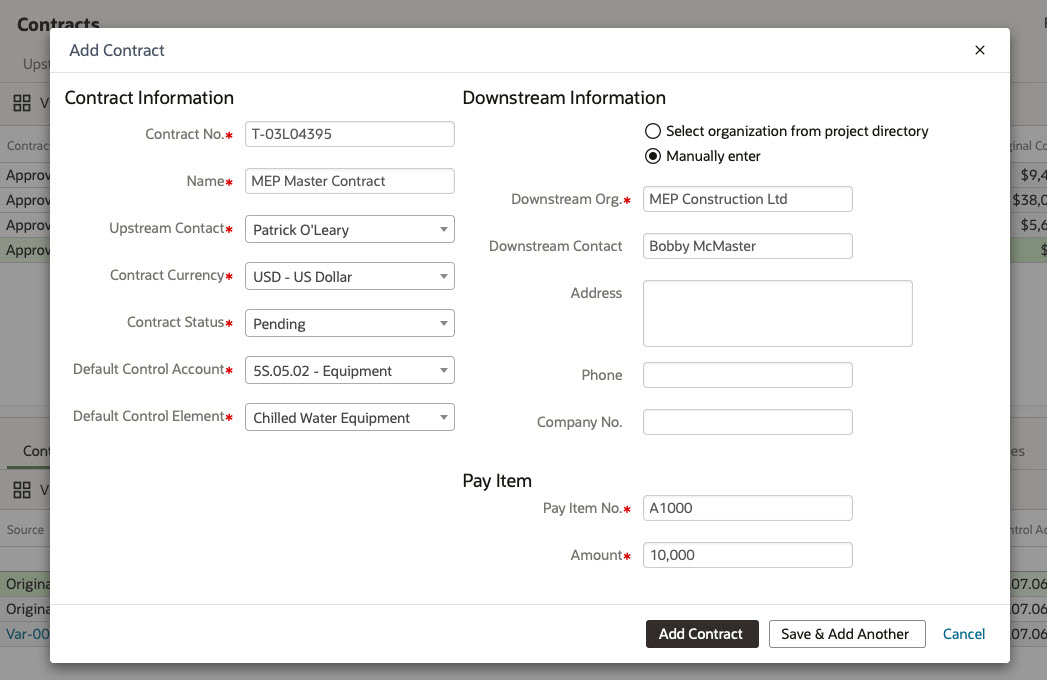
At any point while creating your contract and pay items you can share the contract with the downstream organization. 

You can connect the contract by selecting an organization when you create the contract, but it can only be shared with this organization. If you selected manual, you can edit the contract and connect it to an organization from the project directory. The contract can be shared after it has been connected.

Shared contracts are visible to both the downstream and upstream organization. They allow the downstream to submit contract changes and payment applications to the upstream for review and approval. Only the upstream organization can edit the contract, change its status, or approve changes and payments.

Shared contracts have some restrictions. The contract, payment applications, and contract changes cannot be deleted. If a contract was shared accidentally or is no longer required, it should be put into the canceled status.

Contracts can be shared even if they have payment applications and contract changes. If you’re loading existing contracts that have payments and changes, it is better to create all the data first and share it once everything has been entered. This will allow you to edit or delete the contract, payments, and changes without restriction.

Tip!

Warning: Contracts cannot be un-shared or deleted after they are shared. Ensure you are ready to share the contract and select the correct organization when sharing.

  1. Select the contract in the grid.
  2. Review the connected contract, pay item, payment application, and contract change details to ensure they are correct. If the contract is not connected, you will need to choose an existing downstream organization in the edit contract dialog.
  3. From the toolbar click Share with Downstream.
  4. Verify that the downstream organization information is correct. Note: An error message will be displayed if the contract is not already connected to a downstream organization. Repeat step 2 to resolve this error.
  1. Click Share.
    Note: the contract will be visible to the downstream organization and they will be able to submit contract changes and payment applications for approval.

Editing a Contract

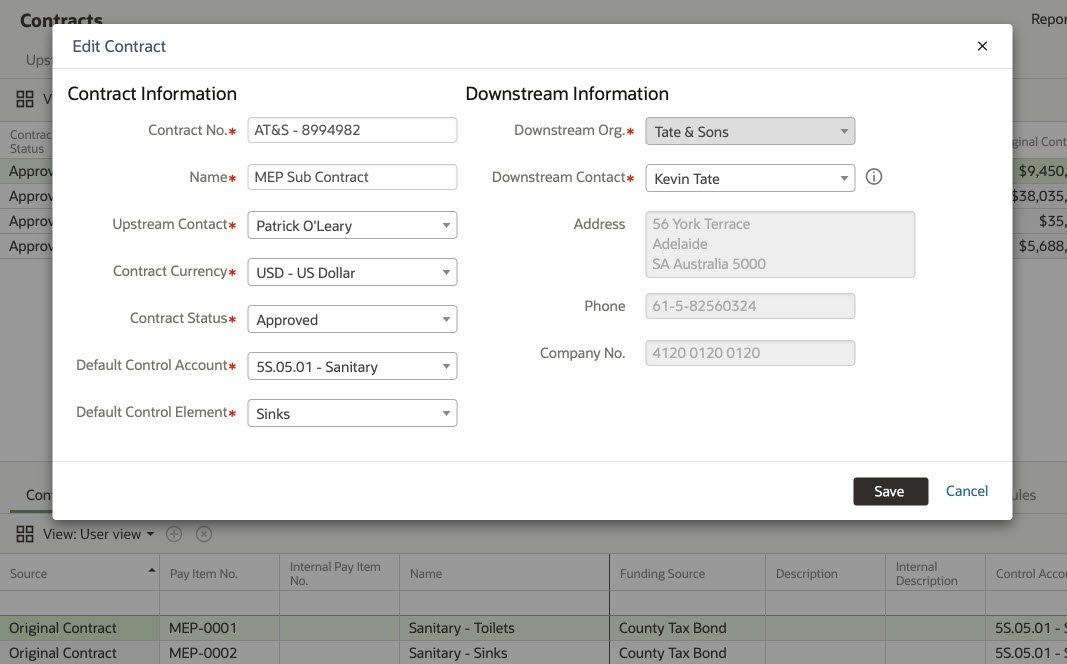
Use the edit contract dialog to modify a contract's details after it has been created, including the contract name, number, status, and downstream organization information. After a contract has been shared, you can still edit the contract, excluding the downstream organization.

  1. Select the contract on the grid.
  2. Click the edit icon on the toolbar.
  3. After editing the relevant information, click Save