Create and edit observations in Field

Work with safety observations in Aconex Field.

Tip!

Observations is currently only available to projects on the KSA1 and MEA Aconex instances. We'll continue to develop features based on feedback and announce availability for other Aconex instances at a later date. Make sure you subscribe to Release Highlights to be notified.

Search and filter observations

  1. From the main navigation menu, click Field and select Observations.
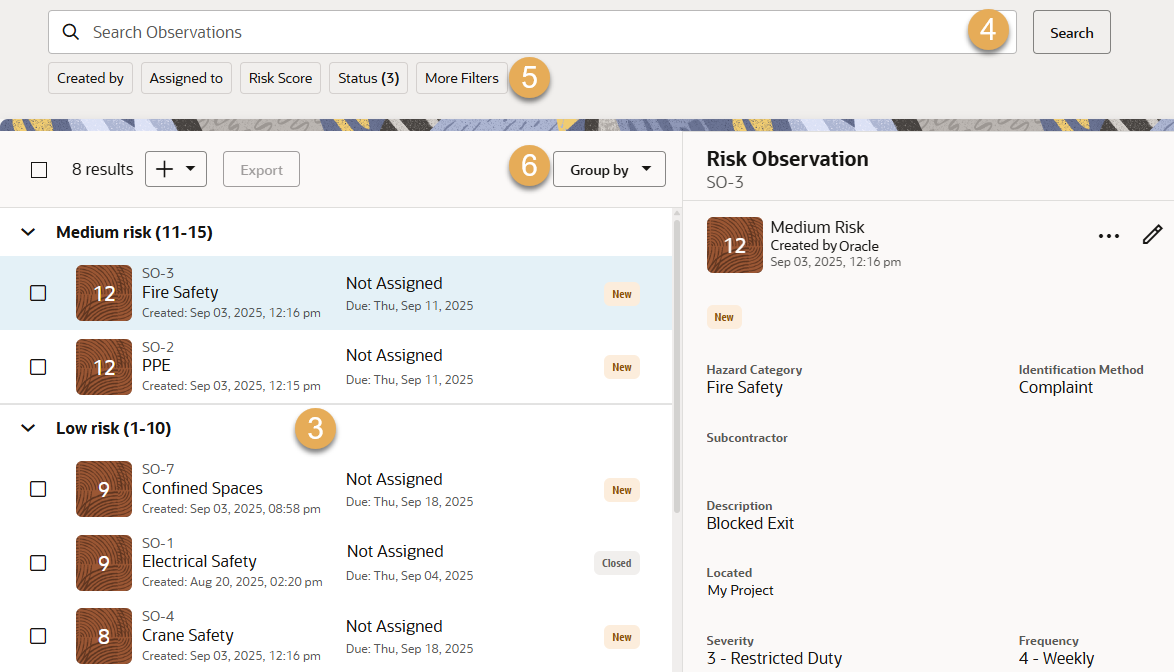
  2. You'll see all observations created by your organization, sorted by risk score.
  3. From the list you can quickly see each observation's details such as the number, hazard category, status, and due date.
  4. Use the search field to find an observation.
  5. Use the filters to refine the list. 
  6. Click Group by to choose how observations should be grouped. By default they are grouped by risk score.

Tip!

Need a report? Select one or more observations and click Export to create a PDF including photos.

Create a positive observation

  1. Click the plus + button at the top of your list of observations.
  2. Click Positive Observation to document good safety practices.
  3. Complete the observation details:
  • Select a status for the observation.
  • Select a Hazard Category from the fixed list of options.
  • Select an Identification Method from the fixed list of options.
  • Select the Subcontractor for the observation. Note this is a visual field only and not connected to an organization record.
  • Add a brief but clear description of the observation. You can enter up to 500 characters.
  • Select the location of the observation. This makes it easy to find.
  • Attach photos, documents, or other relevant files from your computer, so it's clear what the observation is.
    • You can add multiple photos and files at the same time.
    • After adding a photo, click its thumbnail to preview it in full screen.
    • Photos and files cannot be deleted after being added to an observation.
    • Attach files up to 100MB in size.
    • For security, you can't attach .jar and .exe files.
  • Select Great Catch if this was an important observation that was previously missed.
  1. Click Add to create the observation.

Create a risk observation

  1. Click the plus + button at the top of your list of observations.
  2. Click Risk Observation to capture a safety hazard.
  3. Complete the observation details:
  • Select a status for the observation.
  • Select a Hazard Category from the fixed list of options.
  • Select an Identification Method from the fixed list of options.
  • Select the Subcontractor for the observation. Note this is a visual field only and not connected to an organization record.
  • Add a brief but clear description of the observation. You can enter up to 500 characters.
  • Select the location of the observation. This makes it easy to find.
  • Attach photos, documents, or other relevant files from your computer, so it's clear what the observation is.
    • You can add multiple photos and files at the same time.
    • After adding a photo, click its thumbnail to preview it in full screen.
    • Photos and files cannot be deleted after being added to an observation.
    • Attach files up to 100MB in size.
    • For security, you can't attach .jar and .exe files.
  • Select a Severity and Frequency from the fixed list of options. These selections determine the risk score for the observation. 
  • Enter the recommended action to resolve the hazard.
  • Select a user in your organization who is responsible for resolving the hazard.
  • Select the due date. This is defaulted based on the risk score.
  • Select Great Catch if this was an important observation that was previously missed.
  1. Click Add to create the observation.

Edit an observation

  1. Click on an observation you want to edit
  2. Click the pencil icon.
  3. Make you required changes
  4. Click Update.