Support Central
Use advanced SQL or XSL functions in your report layout to insert custom attribute fields, calculated using your own logic.
Before you begin
You should already be familiar with creating your own custom reports. This article assumes you have already created a report layout using the offline template builder.
We'll provide you with some examples to help you get started. Additional formulas can be found in the complete guide on BI Publisher Functions.
Formulas are defined using either XSL or SQL syntax. You cannot use both an XSL and SQL syntax within a single condition statement.
Jump to:
The syntax for SQL and XSL functions for use in RTF templates is as follows:
For extended SQL functions: <?xdofx:expression?>
For extended XSL functions: <?xdoxslt:expression?>
You cannot mix SQL statements with XSL expressions in the same context. For example, assume you had two attributes, FIRST_NAME and LAST_NAME that you wanted to concatenate into a 30-character field and right pad the field with the character "x":
Incorrect syntax: <?xdofx:rpad(concat(FIRST_NAME,LAST_NAME),30, 'x')?>
Why? This syntax begins as an SQL expression, but concat is an XSL expression.
Correct syntax: <?xdofx:rpad(FIRST_NAME||LAST_NAME),30,'x')?>
The examples below in both XSL and SQL are specifically useful to Aconex users.
Calculate the difference between two dates in the given locale. The dates need to be in "yyyy-mm-dd" format. This function supports only the Gregorian calendar.
Note: format is the time value for which difference is to be calculated. Valid values are: y - for year; m - for month; w - for week; d - for day; h - for hour; mi - for minute; s - for seconds; ms - for milliseconds
Formula: <?xdoxslt:date_diff(‘format’, ‘YYYY-MM-DD’, ‘YYYY-MM-DD’, $_XDOLOCALE, $_XDOTIMEZONE)?>
Sample: <?xdoxslt:date_diff(‘m’, ‘2001-04-08’, ‘2000-02-01’, $_XDOLOCALE, $_XDOTIMEZONE)?>
This example will display ‘-14’ as the result.
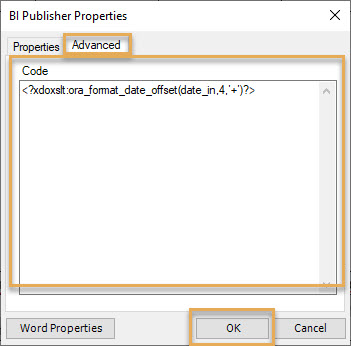
Adds ‘x’ number of days to the given date_in field <?xdofx:date_in?>. Output is rendered in the same date format as that of ‘date_in’ field.
Formula: <?xdoxslt:ora_format_date_offset(date_field, ‘x’, '+')?>
Sample: <?xdoxslt:ora_format_date_offset(date_in,4,’+’)?>
Display different results when various conditions are met. Similar to switch/case/evaluate statements in other programming languages.
Fomula: <?choose:?> <?when:expression?> <?otherwise?><?end otherwise?> <?end choose?>
Sample: Identify all delayed steps in In-Progress Workflows that need action on priority. (if a Workflow step is delayed by over a week it needs immediate action & if it is delayed up to a week then it needs attention)
<?choose:?>
<?when:workflow_status='Completed'?><?end when?>
<?when:workflow_status='Terminated'?><?end when?>
<?when:days_late>7?>Immediate action<?end when?>
<?when:days_late=0?>On Track<?end when?>
<?when:days_late<=7?>Attention<?end when?>
<?end choose?>
Result:
‘Immediate action’ displays when days_late field <?xdofx:days_late?> is more than 7
‘Attention’ displays when days_late field <?xdofx:days_late?> is less than or equals 7
Formula: xdoxslt:date_diff("d", xdoxslt:current_date($_XDOLOCALE, $_XDOTIMEZONE), xdoxslt:ora_format_date(./finish,"yyyy-MM-dd"), $_XDOLOCALE, $_XDOTIMEZONE)
Adds ‘x’ number of days to the given date_in field <?xdofx:date_in?>. Also formats the date output in DD-MM-YYYY.
Sample: <?format-date:xdoxslt:ora_format_date_offset(date_in,4,’+’);'DD-MM-YYYY'?>
Use “if” statements to customize text in your report. As an example, for the sentence ‘The document is reviewed’, we can add the word ‘not’ depending on the value of a field named STATUS.
Sample: The document is <?if@inlines:STATUS='Overdue'?>not<?end if?> reviewed.
Result: If the STATUS is ‘Overdue’ the text will read ‘The document is not reviewed’. Otherwise, it will read ‘The document is reviewed’
Uses an if-then-else condition to display a customized Status. The Status displays as ‘Late’ if date_in is greater than revision_date, otherwise it displays ‘On Time’. The field displays as ‘Not Started’ if date_in is NULL (empty).
Sample:
<?xdofx:If(date_in IS NOT NULL) then
if(date_in>revision_date)
then ‘Late’
else ‘On Time’
end if
else ‘Not Started’
end if?>
Additional formulas can be found in the complete guide on BI Publisher Functions.
Download our .RTF sample templates with examples of XSL/SQL logic. The two samples are provided for further learning and practicing your own formulas.
How to use the sample files:
We've chosen Workflows for these samples, but you can select any available subject area when you create your reports. Custom logic can also be applied to Cost printable reports. The process to create and design your RTF template (adding components such as tables and charts and using formulas) remains the same, however the main subject area selection will be specific to the Cost records (such as Change Event).
Calculate the efficiency of Workflows initiated or assigned to your organization.
RTF Example 1 - Workflow efficiency report
Main subject area: Workflow.
Attributes: Original Due Date, Estimated Due Date, Workflow Name, Workflow No, Workflow Status, Start Date.
Difference between start date and original due date.
	<?xdoxslt:date_diff(‘d',
	start_date,original_due_date,
	$_XDOLOCALE, $_XDOTIMEZONE)?>
Difference between start date and estimated due date
	<?xdoxslt:date_diff(‘d',
	start_date,estimated_due_date,
	$_XDOLOCALE, $_XDOTIMEZONE)?>
Unique count of workflow numbers.
	<?for-each:workflow?>
	<?xdoxslt:set_variable($_XDOCTX,'c',xdoxslt:get_variable($_XDOCTX,'c')+ 1) ?>
	<?end for-each?>
    <?xdoxslt:get_variable($_XDOCTX,'c') ?>
If the Estimated Due Date is on or before the Original Due Date, then the workflow efficiency is 1. Otherwise, the efficiency is Original Days of Completion divided by the Estimated days of completion.
	<?xdoxslt:ifelse((estimated_due_date < original_due_date),
	1.00,
	xdoxslt:div(1,(xdoxslt:div(xdoxslt:date_diff(‘d', start_date,estimated_due_date, $_XDOLOCALE,
	$_XDOTIMEZONE) , xdoxslt:date_diff(‘d', start_date,original_due_date, $_XDOLOCALE,
	$_XDOTIMEZONE)) ))
	)
	?>
Sum of efficiency divided by the number of workflows.
	<?for-each:workflow?>
	<?xdoxslt:set_variable($_XDOCTX,'w',xdoxslt:get_variable($_XDOCTX,'w')+
	xdoxslt:ifelse((estimated_due_date < original_due_date),
	1.00,
	xdoxslt:div(1,(xdoxslt:div(xdoxslt:date_diff(‘d', start_date,estimated_due_date, $_XDOLOCALE,
	$_XDOTIMEZONE) , xdoxslt:date_diff(‘d', start_date,original_due_date, $_XDOLOCALE,
	$_XDOTIMEZONE)) ))
	)
	)?>
	<?end for-each?>
	<?xdoxslt:round ( xdoxslt:get_variable($_XDOCTX,'w') div xdoxslt:get_variable($_XDOCTX,'c'),3) * 100 ?>
Calculate how documents on your Workflows are progressing. Assign a new due date to the documents attached in the Workflow steps.
Specifically:
1. Show a calculated review status of a document attached in a Workflow Step. Status is On-time or Late
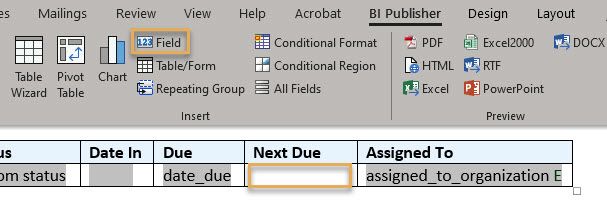
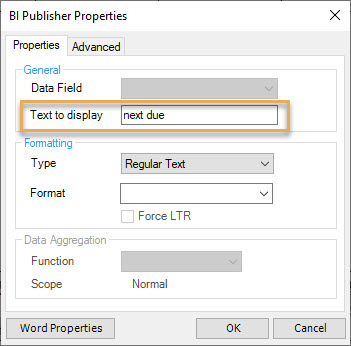
2. Show the next due date (calculated using custom logic) for reviewing a given document attached in the Workflow step.
RTF Example 2 - Workflow progress report
Main Subject Area: Workflow Steps
Main Subject Attributes: Date In, Step Status, Workflow Name, Workflow, No, Document No, Assigned To Org.
Supporting Subject Area: Workflow Documents
Supporting Subject Attributes: Document No, Type, Revision, Discipline, Revision Date, Date Approved
If the Date In is after the Revision Date, then the Document will be given the status “Late”. Otherwise it's “On-time”.
	<?xdofx:
	If( date_in IS NOT NULL) then
	if (date_in > revision_date)
	then 'Late'
	else 'On Time'
	end if
	else ''
	end if?>
Add “N” days to the Date In (N = four days in this example)
<?xdoxslt:ora_format_date_offset(date_in,'4', '+')?>
Have a play with these sample RTF files and try to create more complex calculated fields using your own logic.
See the related articles for more help.


