Create an Identity Provider Policy in IDCS

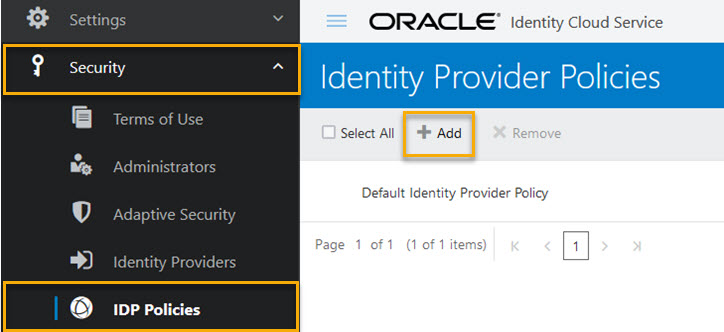
Follow these steps to create an Identity Provider Policy in IDCS as part of the SSO setup for your organization.

Complete these steps after you have provided the ID for the IDCS account to Oracle and we confirm the Lobby is configured to use your IDCS account.

Tip!

You will not be able to create an Identity Provider Policy in IDCS until Oracle confirms the Lobby is configured to use your IDCS account. 

Identity Domain or IDCS?

There are two ways to complete this setup. It depends on what your screen looks like when you start the process. Most of you will be using an Identity Domain in Oracle Cloud, while others will use IDCS (this article).

How to use this guide

  1. You should have read the steps to enable Single Sign-On (SSO) for either the paying or non-paying organization and configured IDCS.
  2. Once Oracle confirms the Lobby is configured to use your IDCS account, you can then complete the steps below to create an Identity Provider Policy in IDCS. 
  3. Follow the remaining steps for either the paying or non-paying organization.

Create an Identity Provider Policy in IDCS

Note: Only complete this step after you have provided the ID for the IDCS account to Oracle and we confirm the Lobby is configured to use your IDCS account. 

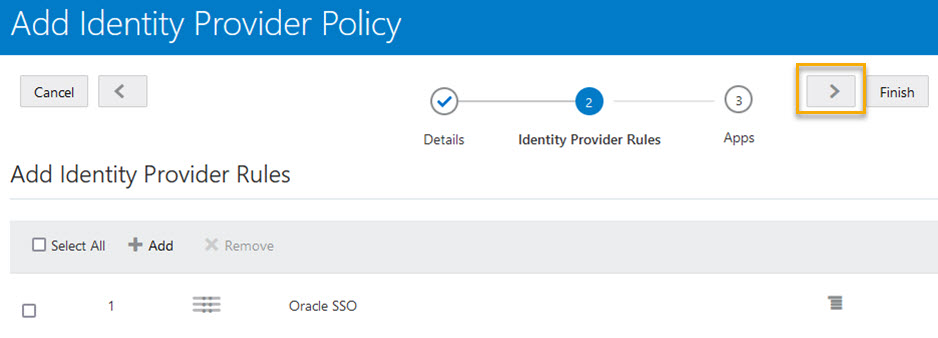
By default, IDCS offers its native login screen with an optional list of external Identity Providers (IdPs)at the bottom. By setting up an IdP policy for an IdP and Application pair we can avoid that step and present the user your IdP's login screen right away.

  1. Choose Security > IDP Policies in the menu to access the Identity Provider Policies.
  2. Click Add to create a new Identity Provider Policy.

Tip!

If your screen looks different, you may have been upgraded to an Identity Domain on Oracle Cloud Infrastructure.

Continue the setup in your Identity Domain.

  1. Enter a policy name such as “[company name] policy” and then choose the “>” button to move to the next screen.


  1. Then choose Add Rules.
  1. Give the rule a name, select the Identity Provider you created and then choose Save.

    Note: 
    Make sure you only add your SSO identity provider to ensure your users are directed to your company's SSO login page. Do not add the provider named Username-Password otherwise users will be directed to the Aconex login page.

Tip!

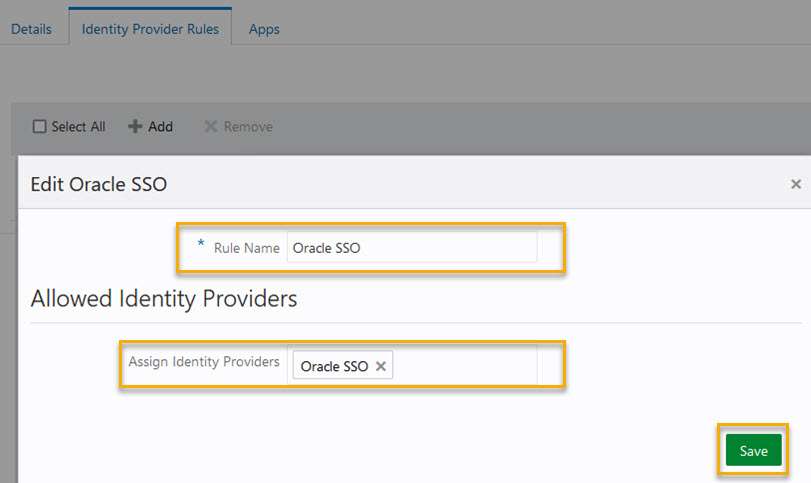
If the Identity Provider you created isn't listed here, ensure your Identity Provider is enabled and try again.

  1. Click > to move to the next step.
  1. Choose Assign Apps to indicate that you want this IDP Policy to apply to users accessing the Lobby.
  1. Search for each of the following apps and click OK:
    Note: The apps you need to add depend on which Aconex instance you are using. 

    For all instances except AU2, add the following apps:
    • Lobby-US-IAD_cegbu_lobby_wtss
    • Oracle SCP Aconex Mobile to Aconex integration_client
    • Oracle SCP Outlook to Aconex integration_client
    • Oracle SCP Aconex Sales Automation to Aconex integration_client
    • Oracle SCP Aconex Archives to Aconex integration_client
    • Oracle SCP Navisworks to Aconex integration_client
    • Oracle SCP Revit to Aconex integration_client
    • Oracle SCP Primavera Cloud to Aconex integration_client (Only available to your organization if you have access to Primavera Cloud)

    For the AU2 instance, add the following apps instead of the above:
    • Oracle_CE_Lobby_AU2_WTSS
    • Oracle SCP Aconex Mobile to Aconex integration_client
    • Oracle SCP Outlook to Aconex integration_client
    • Oracle SCP Aconex Archives to Aconex integration_client
    • Oracle SCP Navisworks to Aconex integration_client
    • Oracle SCP Revit to Aconex integration_client
  1. Once all the above listed apps are added you can continue to the next step.
  1. Click Finish to add the Identity Provider Policy.
  2. The Identity Provider Policy is now created. Your users will be automatically redirected to your chosen identity provider when they sign in to the Lobby or Aconex. Note: They will need to click the change email address icon on the sign in screen. They need to re-enter their email address and click Sign In. This ensures they will be taken to your organization's Single Sign-On screen.
  3. Complete the remaining steps to enable Single Sign-On (SSO) for either the paying or non-paying organization.