Set a default template (auto-text) for a mail type

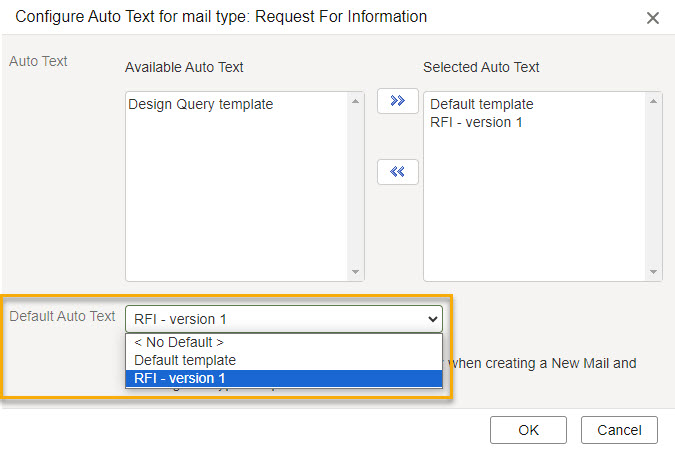
Set up your mail so that each time you create a mail of a certain type, the default auto-text will be added automatically.

You can use an existing template, or create a new template and set it as your default.

Default auto-text can be set at the user, project or organization level. 

  • The user level default will override both the project and organization defaults. 
  • The project level default will override the organization default. Project level auto-text template is specific to the selected project and your organization. You cannot create or manage auto-text used by other organizations.

You'll need appropriate permission to set auto-text at the organization or project level.

  • Edit organization information provides access to the organization preferences tab. Typically the Org Admin role has this permission.
  • Edit project settings provides access to the project preferences tab. Typically the Project Admin role has this permission.

Tip!

If Mail and Document types for your project are locked, you won't be able to set default auto-text for mail types. Your Project Admin can temporarily unlock these for you. See How to enable the Edit button.

Set default auto-text

  1. From the main navigation click Setup, and select Preferences.
  2. Click either the UserProject or Organization tab, depending on who you want the default auto-text to appear for.
  • User level default auto-text appears only for you on this project.
  • Project level default auto-text appears for all users in your organization on this project.
  • Organization level auto-text default appears for all users in your organization on all projects.
  1. Scroll down to the Mail preferences. 
  2. At Select mail types, click the Edit button.

Tip!

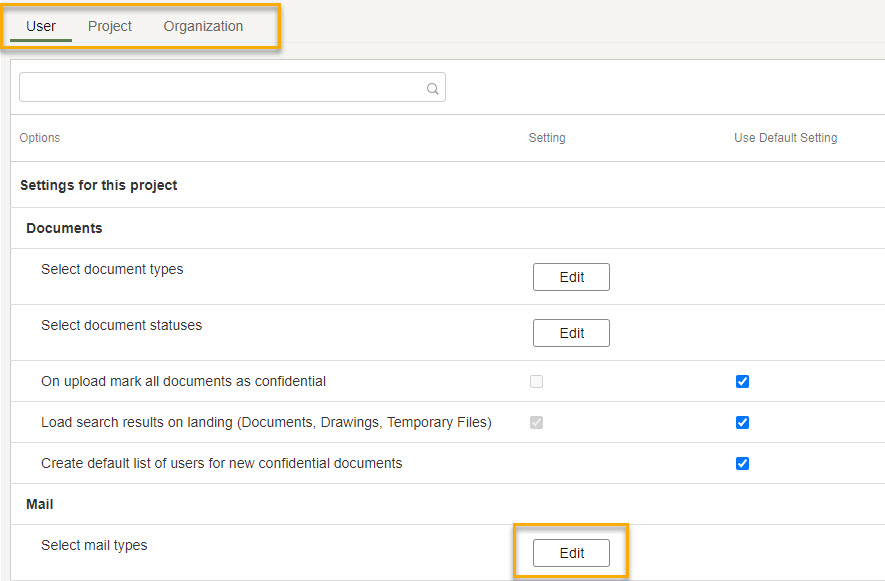
If the Edit button isn't available, the Mail and Document types for your project are locked.  Your Project Admin can temporarily unlock these for you. See How to enable the Edit button.

  1. Click Auto-text next to the mail type you want to set the default auto-text for.
  1. If required, change the auto-text available for this mail type:
  • To add auto-text items, double-click items in the Available Auto-text list. Items in the Selected Auto-text list appear in the Default Auto-text list.
  • To remove auto-text items, double-click items in the Selected Auto-text list 
  1. Click the the Default Auto-text list and choose the default auto-text you want to use for this mail type. The options listed here are the ones in the Selected Auto Text field.
  1. When you’ve finished, click OK, and then the Save button.

How to enable the edit button

Only the Project Admin from the Aconex project-owning organization can complete these steps.  

If the Edit button isn't available, the Mail and Document types for your project are locked. To unlock these you'll need to disable the following project preferences:

  • Enable project wide auto-numbering of documents
  • Lock mail and document types across all organizations so only the project owner can change these settings
  • Lock project mail auto-numbering scheme across all organizations so only the project owner can change these setting

Once these preferences are unticked and saved you need to refresh the page and the Edit button will be available. Other organizations on the project should now be able to set their required default auto-text.

After the required auto-text defaults have been set, make sure you lock the Mail and Document types again, to keep the document/mail types standardized for the project.