Turn on 2-Step Verification (2SV) for your project

2-Step Verification (2SV) provides an extra level of security for your project.

Required permissions
Edit Project Settings

As the project owner, you may switch on 2SV across your entire project. This means all users from all organizations will only be able to access the project if they have signed in with two-step verification (2SV). They can follow these steps to enable 2SV on their account.

We recommend you communicate this change before enabling this setting. 

Before you enable this setting

  • Communicate with all project participants to inform them of the upcoming change. Make sure you include:
    • The date it will happen, (we suggest it's enabled outside of business hours).
    • Details of how it will affect them (for example, they will now need to generate and enter a 6-digit code every time they log into Aconex). They should also ensure there are at least two people in their organization that are admins who can reset 2sv authentication for their users.
    • Key contacts in your organization who can address any concerns.
    • Our contact page so they can reach support for assistance.
  • Consider working with key organizations on the project to have them turn on 2-Step Verification for their users, before the change, so they can manage it themselves. 
  • Send a reminder the day before the change. And send a confirmation once you've enabled it.

Enable 2SV on your project

  1. Log into Aconex and select the project you want to enable 2SV for.

  2. Click Setup from the main navigation menu.

  3. Under Configuration, select Preferences.

  4. Click on the Projects tab.

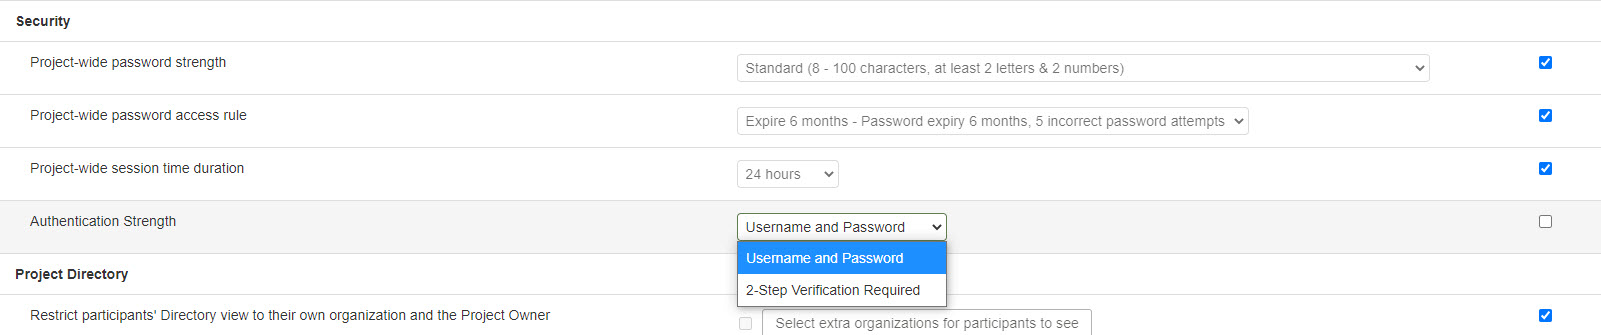
  5. Scroll to Project-wide settings, and under Security, you’ll see the Authentication Strength options.

  6. Click on the Use Default Setting checkbox in the right-hand column to deselect it.

  7. In the dropdown menu, select 2-Step Verification Required.

Tip!

If you don't see this option, please contact your Oracle representative or support to get it enabled.

  1. Click Save at the top-right of the page to save the project setting.