Create and edit test plan templates

Test plan templates streamline quality control and provide a structured framework for projects.

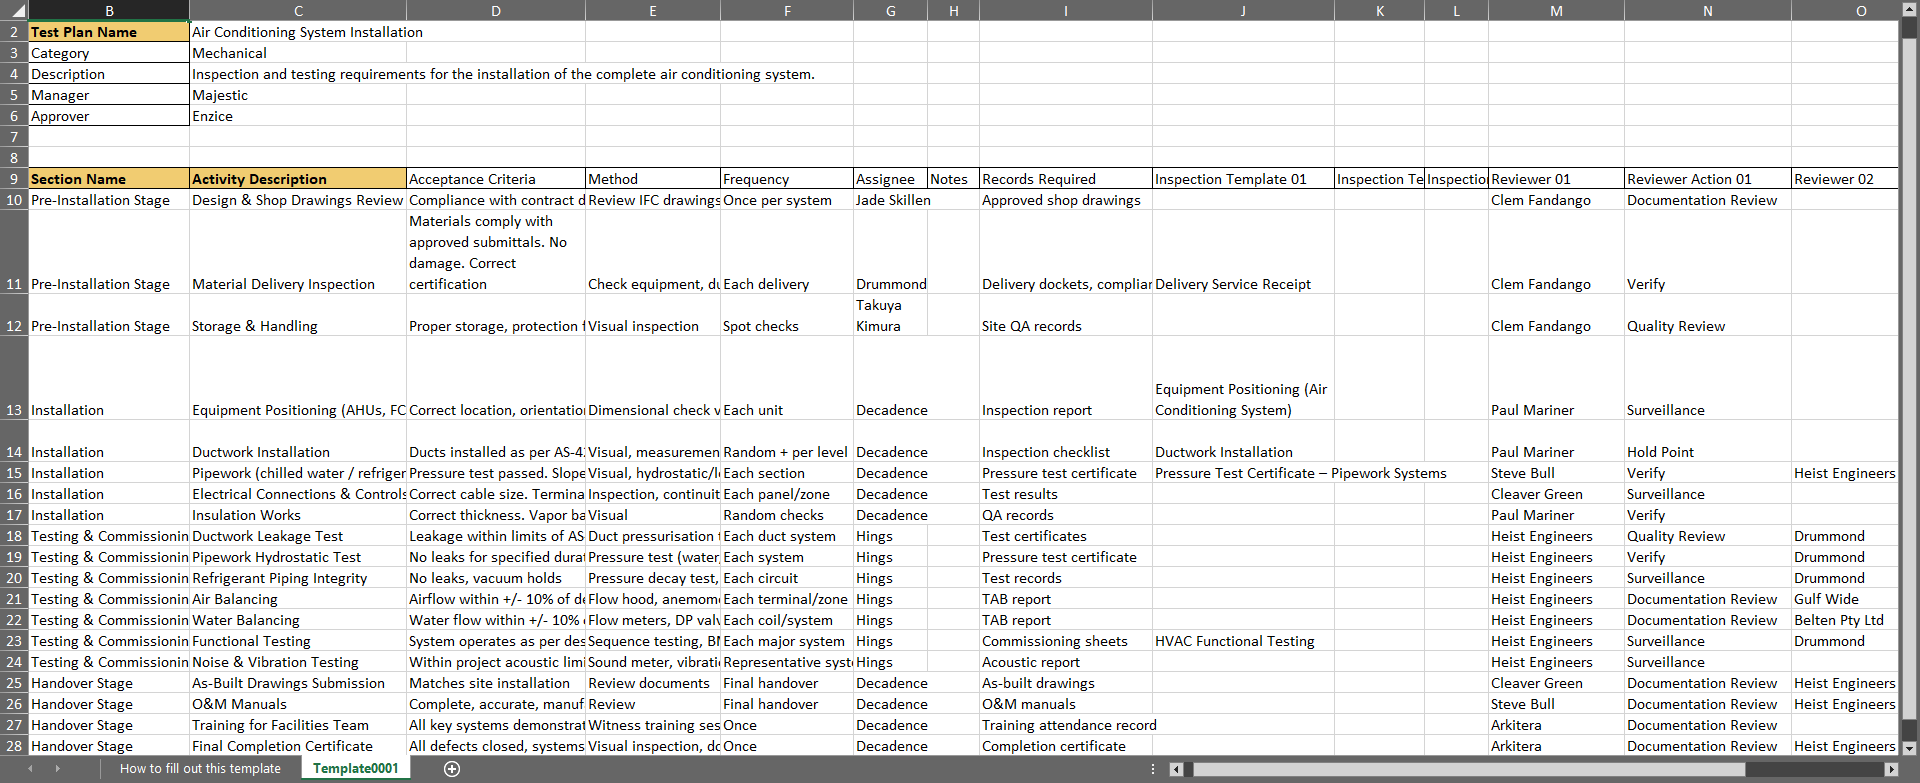
Users select a template when they create a test plan. A well structured template saves time, resources, and prevents costly mistakes. 
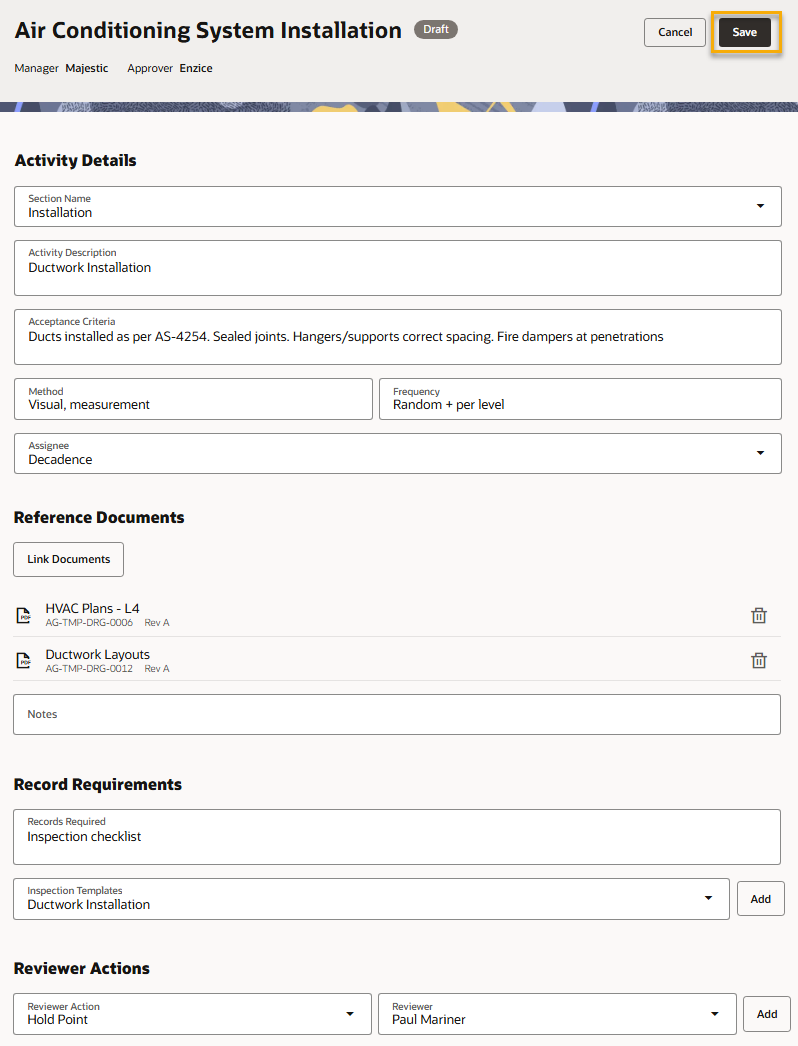
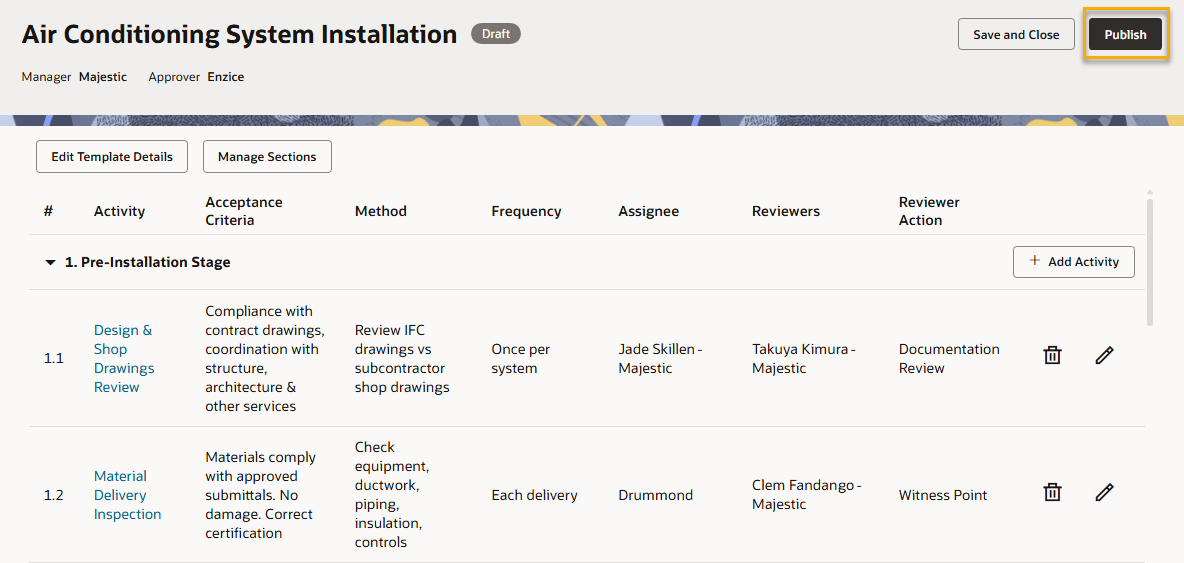
Once a test plan is created the assignees follow the guidelines provided in the template to complete their activities in the test plan. This ensures projects meet standards and specifications and the required evidence is thoroughly documented.


Things to note:


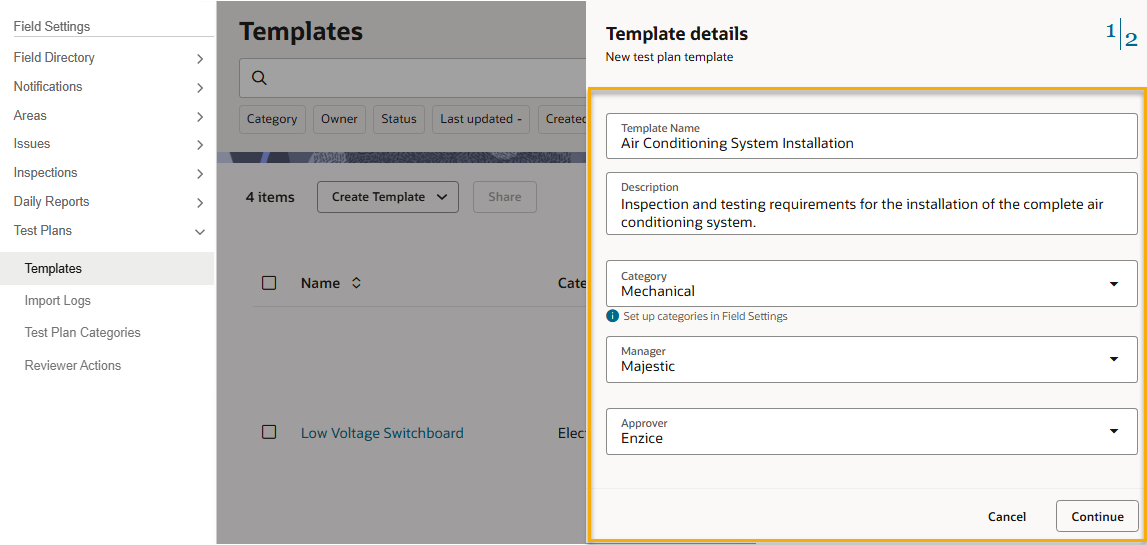
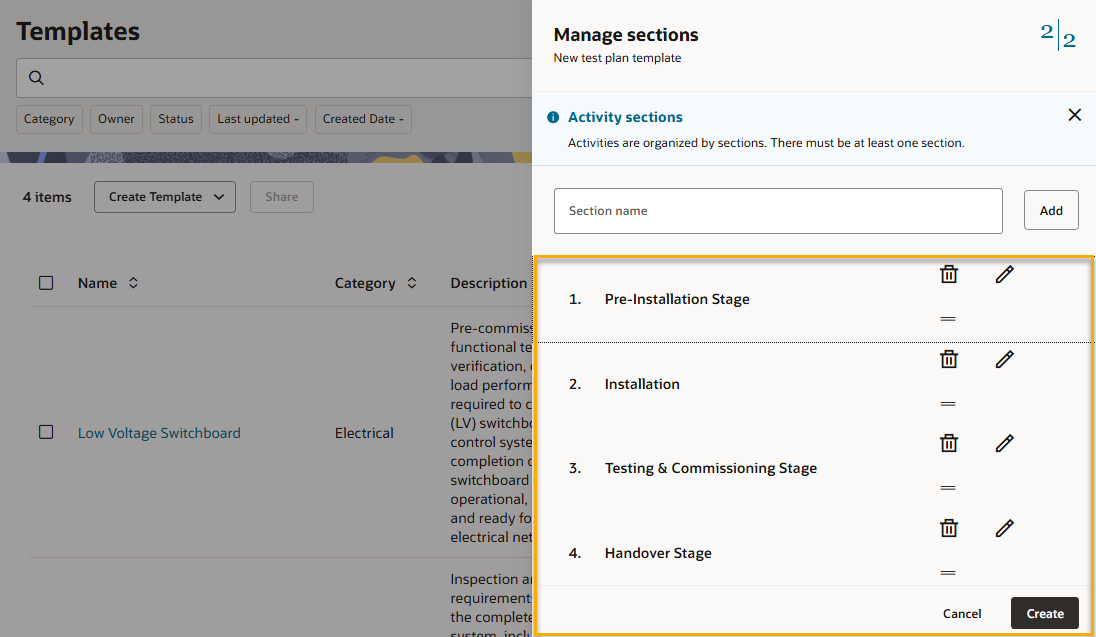
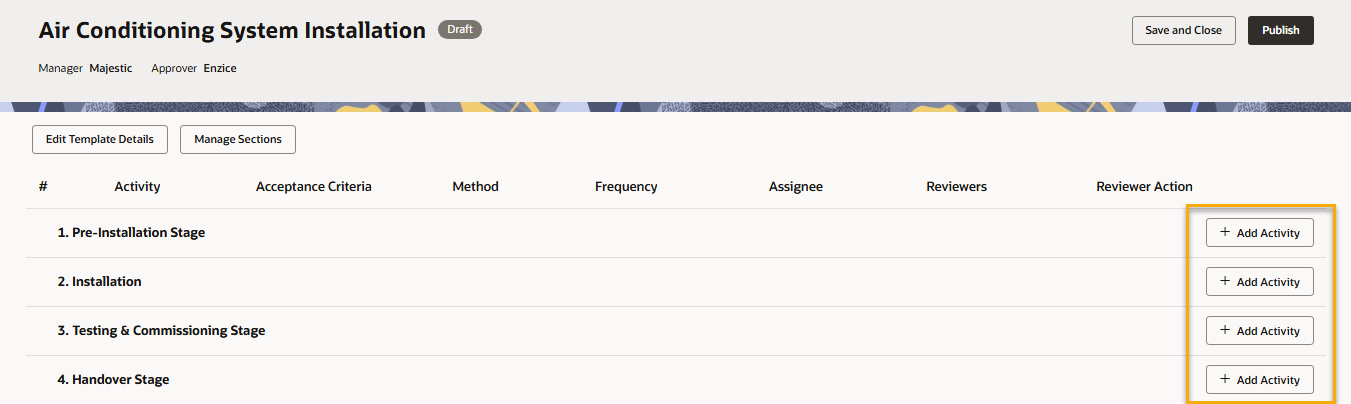
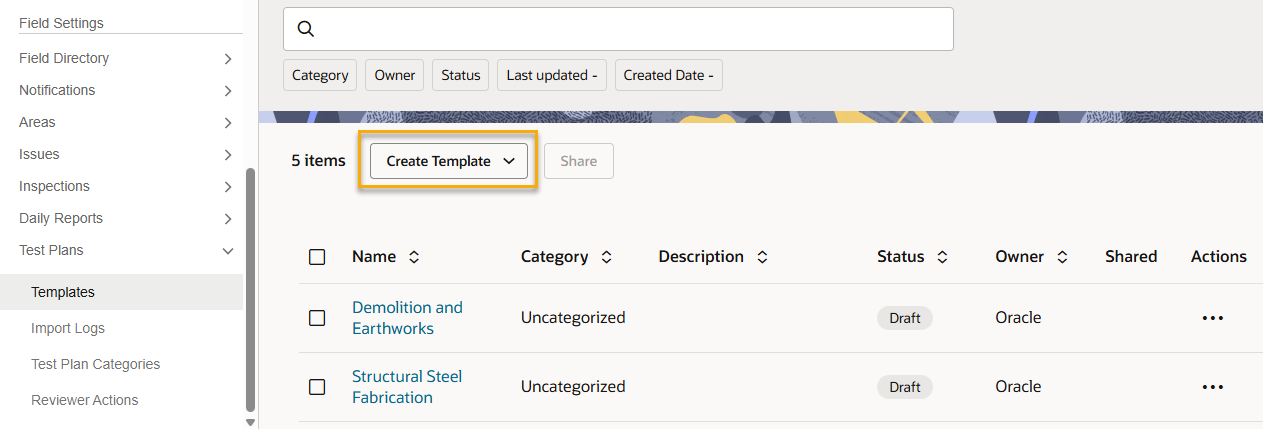
The following options are available to create a new template:

  • Import using Excel - (Recommended) Use this option to quickly create up to 10 templates at once. The Excel template provided ensures you enter the correct information for a successful import. Once you've created the templates you can edit them to add more details including reference documents, inspection templates and reviewer actions.
  • Input Manually - Use this option to create templates within Aconex.
  • Copy from Project - Use this option to copy templates from another project you have access to.

Tip!

Test Plans is currently only available to projects on the KSA1 and MEA Aconex instances. We'll continue to develop features based on feedback and announce availability for other Aconex instances at a later date. Make sure you subscribe to Release Highlights to be notified.

View your templates

  1. From the main navigation menu, click Field and select Settings.
  2. Click Test Plans and select Templates.
  3. You'll see all templates created by or shared with your organization
 

For each template, you'll see the following details:

  • Name - The name of the test plan template.
  • Category - The category that the template belongs to.
  • Description - The description added to the template.
  • Status - The current status of the template.
  • Owner - The name of the organization that created the template.
  • Shared - Indicates whether your organization has shared the template with others, or other organizations have shared it with your organization.
  • Actions - Depending on the status and owner of the template, the following actions can be performed by clicking the three dots menu:
    • Properties - View additional details about the template such as Created By, First Published Date, Last Updated Date, Last Updated By, Current Version, Manager and Approver.
    • Delete Template - If the template has never been published and is owned by your organization, it can be deleted.
    • Share - If the template has been published and is owned by your organization, it can be shared with other organizations in the project.
    • Review Log - If the template has been sent for review and approval, any review comments given by the approver can be viewed here.

Search, filter and sort your templates

Use the search field to search for a template name or description.

Click the filters under the search field to refine the list of templates:

  • Category - Choose one or more categories. 
  • Owner - Choose one or more organizations who created the templates you want to find.
  • Status - Find templates with a specific status.
  • Last Updated - Find templates last updated within the specified time period.
  • Created Date - Find templates created within the specified time period.

Click a column heading (except Shared and Actions) to sort alphabetically in ascending or descending order.

Create a template using Excel Import

  1. Click Create Template to create a new test plan template.
  2. Select Import using Excel and click Continue.
  3. Click Download import template. This template contains the latest information about categories, reviewer actions, inspection templates, users and organizations, that have been configured for this project. We recommend you download the import template every time you create a new template using excel, so you have the latest updates from your project.
  4. If prompted, click to save the file on your computer. It may download directly depending on your web browser. By default, the file will be named TestPlanImportTemplate.xlsx. 

  5. Open your metadata template file in your spreadsheet application such as Excel.
  6. You'll find instructions in the first worksheet of the template to guide you through each step.
  7. Complete all the mandatory fields. They're shown with a highlight and bold text in your file.
  8. Complete as many of the other fields in the template as you need to.
  9. Save the template.
  10. Upload the template file by dragging and dropping it, or click anywhere in the outlined space and choose files from your computer. 
  11. Click Import.
  12. You'll see an icon next to each file to show you if the import was successful or not.
  13. Click Close to see the templates that were imported successfully. They will be in Draft status.

View Import Logs

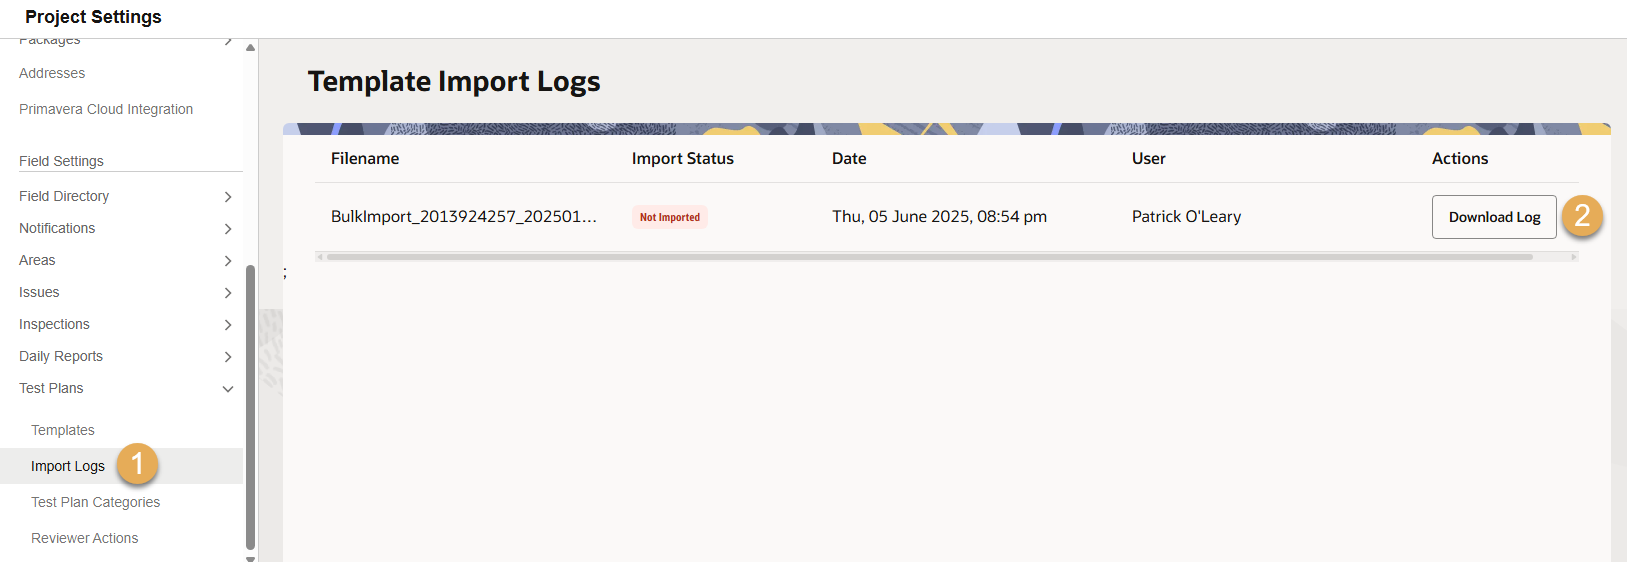
If a template failed to upload you can check the import logs to find out why. Then you can fix the template and try the import again. You can also see successful imports here, but they will not have a log file.

  1. From the Test Plans project settings click Import Logs.
  2. Find the import that failed and click Download Log.
  3. View the log and see the reason for failure and how you can correct it.

Create a template manually

  1. Click Create Template to create a new test plan template.
  2. Select Import manually and click Continue.
  3. Enter the details of the template name, description, category, manager, and approver.
  • The template name is the only required field in this form.
  • If you don't select a category, the template is automatically assigned to the Uncategorized category.
  1. Click Continue.
  2. Add the sections of the template. These are the headings that will contain the activities. You can delete, rename, and reorder them as required.
  3. When you have finished adding your sections, click Create.
  4. The template is created as a draft. Now you need to add the required activities to each section.
  5. Click Add Activity. Complete the fields as required:
  • Activity Description - Describe the activity that you would like the Assignee to perform. This is the only required field in this form.
  • Acceptance Criteria - Define the conditions that must be met to consider the activity complete and performed to satisfaction.
  • Method - Define the specific procedures or techniques to be used to conduct the tasks in the activity.
  • Frequency - Define how often the task needs to be performed in the activity.
  • Assignee - Select the user or organization responsible for performing this activity.
  • Link Documents - Link up to 10 documents from the document register to each activity. These documents act as a supporting documentation or specification for the assignee while performing the activity.
  • Notes - Add details of any other references or resources here.
  • Records Required - Define what type of records are required as evidence of performing this activity. Some examples of records are an Inspection and photos of the task.
  • Inspection Templates - If the assignee needs to perform an Inspection, you can add the inspection template that you would like them to use. Add up to 5 Inspection templates to each activity.
  • Reviewer Action and Reviewer - Select the reviewer action (such as a Hold Point) that needs to be performed while reviewing this activity Select the user or organization responsible for the review.
  1. Once all the required details are added, click Save to add this activity to the template.
  2. (Optional) Click Edit Template Details to edit any details at a template level.
  3. (Optional) Click Manage Sections to reorder activities and sections, including moving activities from one section to another. You can also delete sections that do not have any activities added. To delete a section that has activities, you need to delete the existing activities.
  4. Click Save and Close to save your changes and work on it later.
  5. When you're ready, click Publish to finalise the template.

Edit a template

You can edit a published template that was created by your organization. Updating a template will increase it's version number by 1. Your changes will not update any existing test plans.

  1. Click to open a template and click Edit. You can edit all the fields, associated inspection templates, and linked documents in the template. 
  2. You can save your changes to Draft to work on it later by clicking Save and Close.
  3. Once you are ready, click Publish to update the template, so it can be used for new test plans. The latest version of a template is always used when creating new test plans.

Tip!

You can check the version of the template from the Properties option under the three dots menu

Copy templates from another project

You can copy up to 25 templates from other projects that you have access to. You need to be a Test Plan Admin or Associate in the project you are copying from.

Note: Project specific data such as participants, categories, reviewer actions, inspection templates, and documents from the source project are not copied.
  1. Click Create Template to create a new test plan template.
  2. Select Copy from Project.
  3. Select the project you want to copy from.
  4. Select the template(s) you want to copy.
  5. Click Copy.
  6. The template(s) will be created in Draft status. You can edit them as required.

Copy a template in the current project

You can create up to 10 copies of a template at a time. The template(s) will be created in Draft status.

The Copy action is available under the three dots menu for each template.

Note: Project specific data such as participants, categories, reviewer actions, inspection templates, and documents from the source template are copied.

Delete a template

You can only delete templates that are created by your organization and have never been published.

The Delete action is available under the three dots menu for each applicable template.