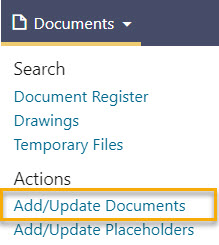
Add Documents (upload files)

Upload new or updated files to your document register.

Required permissions
Upload new documents

Follow this guide to upload up to 100 documents to your Document Register. 

Before you start, it's a good idea to prepare the files with a consistent naming convention. We recommend including at least the Document number and Revision in the filename. This helps Aconex prefill information during the upload process; saving time.

Tip!

Use Bulk Processing if: 

  • you need to upload more than 100 documents at once.
  • you need to upload multiple versions of your documents at once.
  • your project has a large document field cascade or project field hierarchy, and you need to upload more than 20 documents. 

Upload your files

  1. From the main navigation menu, click Documents and select Add/Update Documents.
    You can also Add Documents from the document register search screen.

Tip!

If you see different menu options, you may be using the classic upload. We recommend you switch to the new upload.

  1. The Upload Documents tab is selected by default.
  • If you need to update metadata without changing the files follow the steps to Update Metadata Only.
  • If you want to upload a zip file that will expand on upload, use Zip File Upload. You'll first need to select an upload profile that has Expand zip files enabled.
  1. (Optional) Select an Upload Profile from the dropdown (or just leave it as default). Document upload profiles save you time by automatically populating metadata for you.
  1. Drag and Drop your file(s) from your computer into the space provided. Alternatively, click anywhere in the outlined space and choose the files from your computer. You can also Upload from Dropbox or Box.
  2. On the next screen, your files will be listed on the left. If an existing document number is recognized from the file name you'll see an Update label. Otherwise, your files will be labeled as New.

Tip!

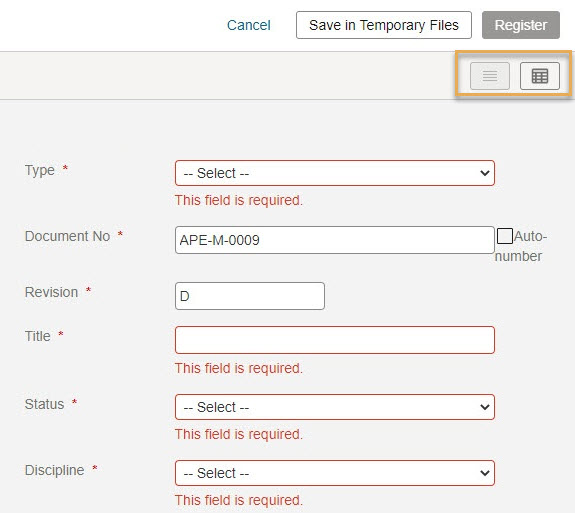
The input fields you see on your project may be different from the example shown here. Each project in Aconex is customized to suit different requirements. If you are unsure what you need to be entering in each field please contact your Document or Project Administrator.

  1. Choose to work in either List view or Table view from the icons on the top right.
  1. If you selected an upload profile, the metadata for your documents may have been automatically populated for you. Those files will be marked as Ready to register.  If any files are marked as Missing information, you'll need to select them, and manually enter the required metadata.

Add/update metadata

  1. Click each file and enter the document information such as Title, Revision, or Status. Make sure all mandatory fields (highlighted in red) are completed.

Tip!

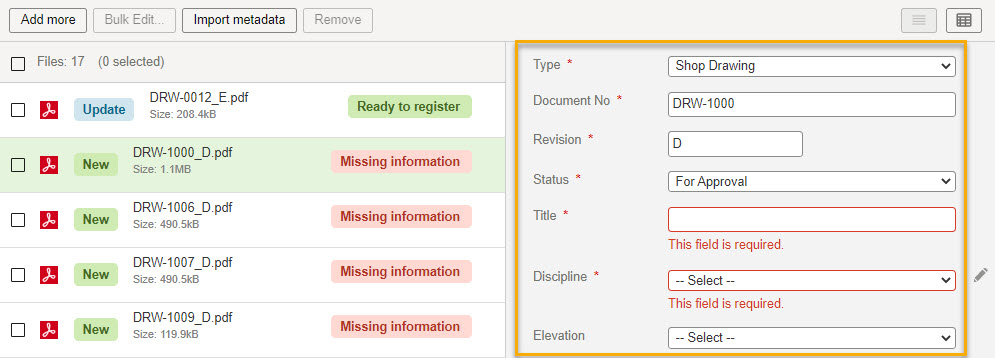
Avoid entering special characters such as < or >. See Invalid characters in Document and Project Fields

  1. (Optional) Select multiple files and click Bulk Edit to update their metadata in one go. For example, you may want to set the Discipline as Electrical for all except one of the files you just uploaded.

Import Metadata

  1. Click Import metadata to populate your metadata from an Excel spreadsheetOtherwise, you can skip to finalizing your documents.
  2. Download the template containing the input fields that need to be populated. This may be a combination of document and project fields. Each project will have a unique template. Templates will change if fields are changed on your project, so it's always best to start with a fresh template.
  3. Open your metadata template file in your spreadsheet application such as Excel.
  • You'll see a worksheet for each document type that helps you keep things organized. 
  • Single-select fields appear as a dropdown for faster, more accurate data entry.
  • If you've uploaded files, you'll find a worksheet containing your filenames. Copy these to the relevant worksheet for each document type. Make sure you enter the correct document numbers and other metadata against the correct files.
  • You'll also find instructions in the first worksheet of the template to guide you through each step.
  • During the import process, worksheets are read from left to right. If a document is changing its document type from one version to the next, the order of the sheets can be changed to achieve the correct ordering of versions. Do not remove any of the worksheets otherwise the process may fail.
  • If auto numbering has been enabled for the document type you are uploading documents for, you can leave the Document No. field blank on the metadata template. Aconex will auto-assign the next available document number for that document type.
  1. Complete all the mandatory fields. They're shown in bold in your file.
  2. Complete as many of the other fields in the template as you need to. Project fields are displayed in blue font.
  3. Upload the populated metadata file by dragging and dropping the file, or click anywhere in the outlined space and choose files from your computer. 
  4. Click Import.
  5. Click Download Metadata Logs after importing a metadata file. Check the result column for any errors with the imported file. If there are no errors you'll see an OK result.
  6. Check your documents have been updated with the correct metadata.

Tip!

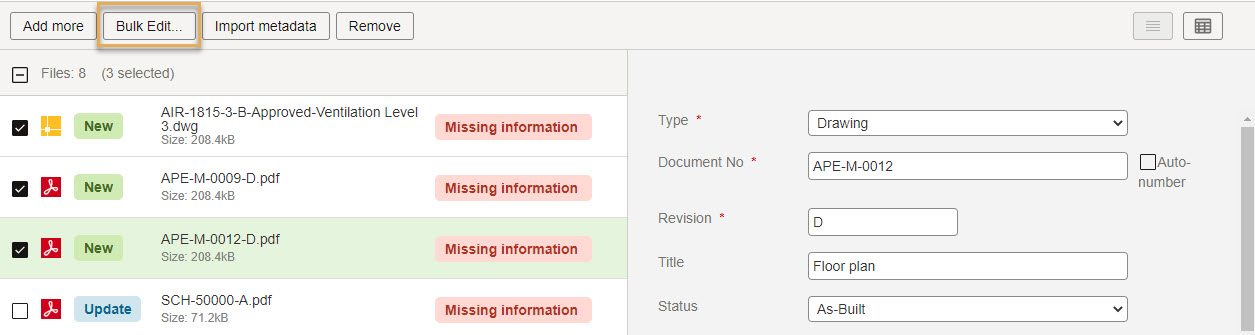
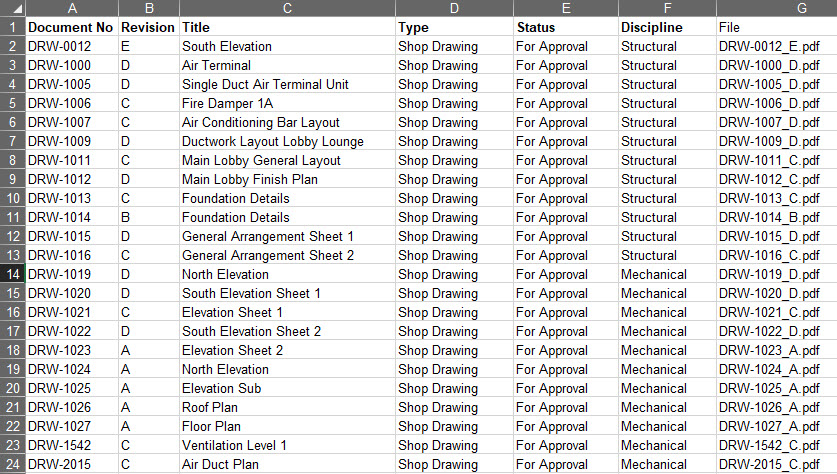
Once you are familiar with the process, you may choose to bulk upload all your documents in a single worksheet.

Finalize your documents

  1. If you need to add more documents, click Add more to open the drag and drop panel.
  2. If you need to remove a file you no longer wish to upload simply select it and click Remove. Alternatively, hover over the document and click the next to the status label.
  3. Once all mandatory fields are completed, the files will be labeled as Ready to Register.
  4. If you want to save your work and return later click Save in Temporary files. Note that other users in your organization can delete temporary files.
  5. If you are ready to register your documents in Aconex click Register. You'll see a prompt that your documents have been uploaded to your organization's Document Register

Tip!

If you don't see the Register option, you do not have permission to upload new documents. Please ask your Organization Administrator to grant you permission.

  1. (Optional) Transmit the document(s) so other organizations can access them.
  2. (Optional) Select up to 50 documents, and add them to packages.

Status label definitions

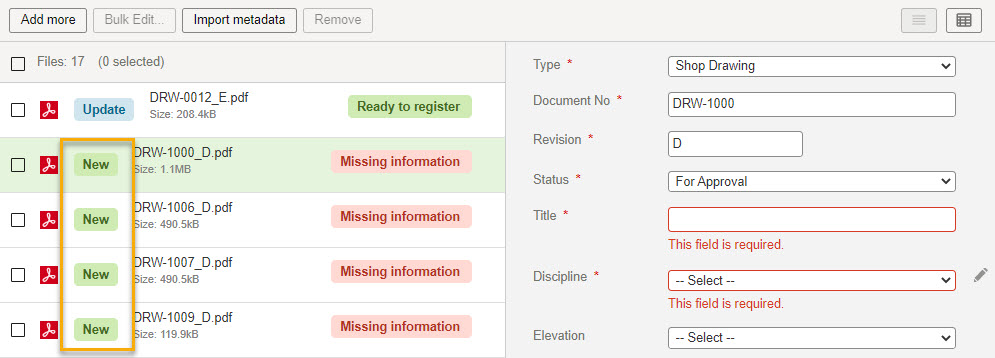
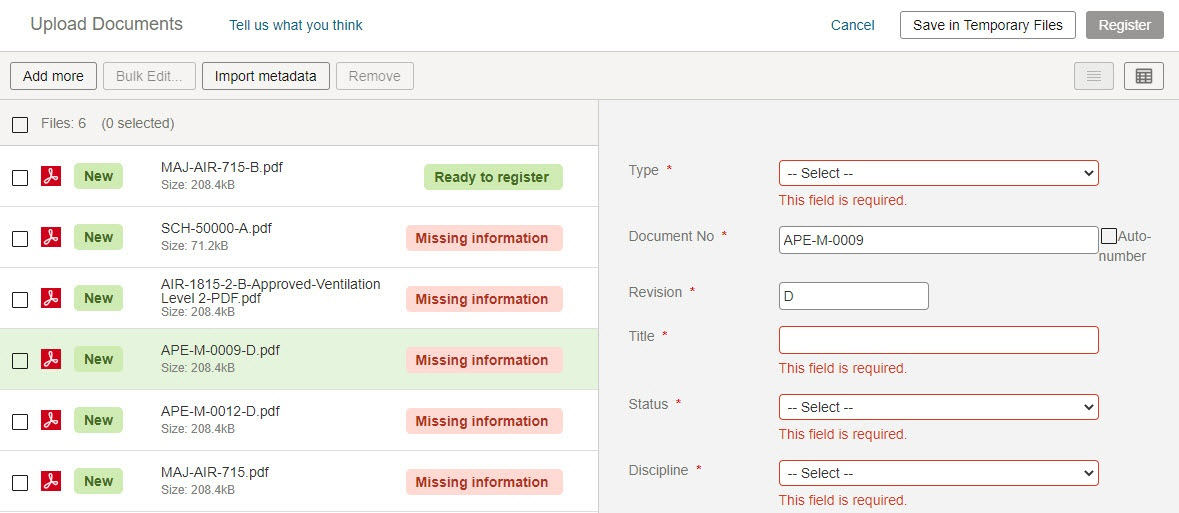
New - This is a new document that will be uploaded to your document register

Missing information - This document has missing mandatory metadata that must be completed

Ready to register - This document has all mandatory metadata completed and is ready to be upload to the document register

Placeholder - This document has no associated file and will be registered as a placeholder 

Update - A version of this document already exists and will be updated with this new file.

What's next?