Update documents (new enhanced upload)

Update documents with new metadata or files.

Permissions requises
Update a document

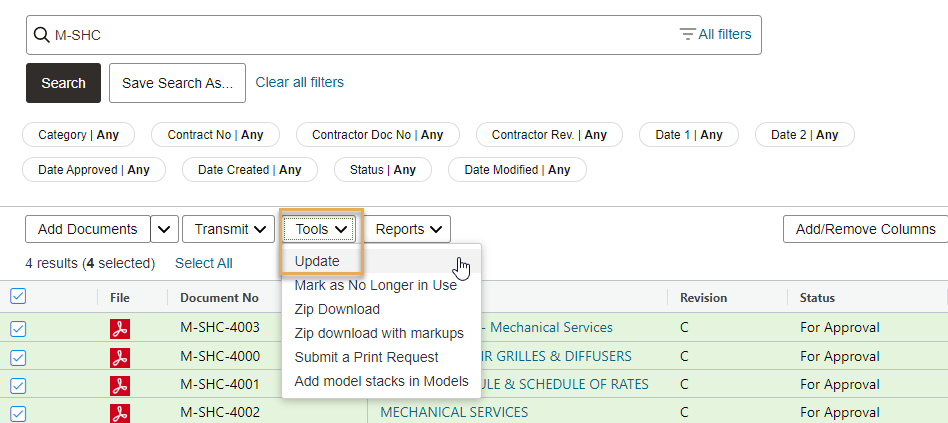
You can update documents one by one, or in bulk. In Aconex, updating a document is sometimes referred to as 'superseding'. 

You can update an existing document to:

  • Upload a new file.
  • Update the metadata (such as the discipline or status).
  • Correct a mistake (such as fixing a typo in the title).

After you update a document, the system creates a new version for it. This new version becomes the current version of the document. All previous versions of a document are kept in Aconex automatically, so you can always see what's changed, when, and by whom. Learn how to access previous versions of a document.

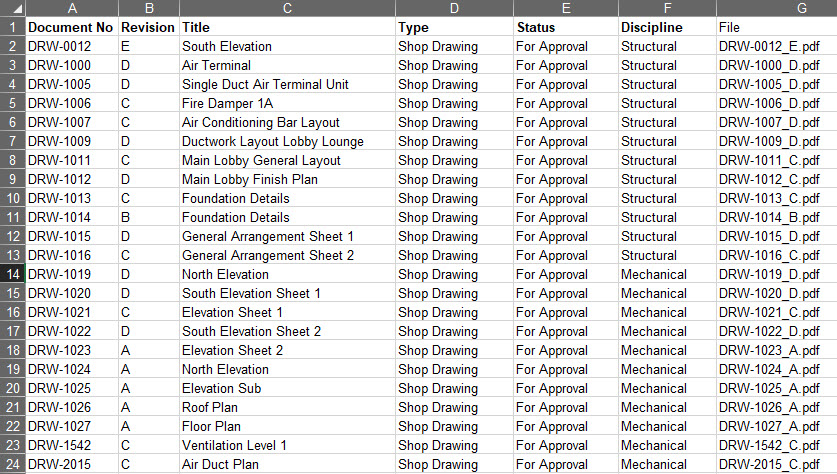
Before you start, it's a good idea to prepare your files with a consistent naming convention. Including the document number and revision in the filename helps Aconex prefill information during the process; saving time.

Note

If you need to update files for many documents, follow the steps to Add or Update Documents. If an existing document number is recognized from a file name you've uploaded, you'll see an Update label.

Upload a new file

  1. Search the document register and select the document(s) you wish you update.
  2. Click Tools and select Update.

Note

If you see different menu options or your screen looks different, you may be using an older upload. We recommend you switch to the new enhanced upload.
  1. To update a single document, click on the document number and change the values within the right-hand panel such as Title, Status, or Discipline.
  2. To update the file associated with this document, drag and drop the new file from your computer into the space provided. Alternatively, click anywhere in the outlined space and choose file from your computer. You can also Upload from Dropbox or Box. 

Note

The input fields you see on your project may be different from the example shown here. Each project in Aconex is customized to suit different requirements. If you are unsure what you need to be entering in each field please contact your Document Controller or Project Administrator.
  1. You can click to expand the metadata panel to see more of the available fields. Click on each document to continue adding metadata until they have all been updated. 

Note

Avoid entering special characters such as < or >. See Invalid characters in Document and Project Fields
  1. (Optional) If you need to apply the same metadata to multiple documents, select them and click Edit. For example, you may want to set the discipline as Electrical for all except one of the documents.

Import metadata from Excel

If you have lots of files to update you can populate your metadata from an Excel spreadsheetOtherwise, you can skip to the next section of this guide below, titled Finalize and update your documents.

  1. Click Import metadata.
  2. Download the template containing the input fields that need to be populated. This may be a combination of document and project fields. Each project will have a unique template. Note: Templates will change if fields are changed on your project, so it's always best to start with a fresh template.
  3. Open the metadata template file in your spreadsheet application (such as Excel).
  • You'll find instructions in the first worksheet to guide you through each step.
  • If your project is configured to use a multi-sheet template, you'll see a worksheet for each document type. Also, you'll find a worksheet containing your filenames. Copy these to the relevant worksheet for each document type.

  • If your project is configured to use a single-sheet template, you'll find the filenames in the file column.

  • Make sure you enter the correct document numbers and other metadata against the correct files.
  • Single-select fields appear as a dropdown for fast, accurate data entry.
  • During the import process, worksheets are read from left to right. If a document is changing its document type from one version to the next, the order of the sheets can be changed to achieve the correct ordering of versions. Do not remove any of the worksheets otherwise the process may fail.
  1. Complete all mandatory fields. They're shown in bold in your file.
  2. (Optional) Complete project fields as required. They're displayed in blue font.
  3. (Optional) Complete as many of the other fields in the template as you need to. 
  1.  Save the completed metadata file and upload it by dragging and dropping it into the space provided. Alternatively, click anywhere in the outlined space and choose the file from your computer. 
  2. Click Import Template.
  3. If there's an error with the import you'll see a message on screen. For example, you may have entered an incorrect filename. Update the template and try the import again.
  4. Once the import is successful, the list of documents will be updated and ready to update. Click through and check they have been populated with the correct metadata.

Finalize and update your documents

  1. (Optional) If there's a file you don't want to update, click the remove icon in the document's row. You can select multiple files and click the Remove button. 
  2. Click Update Documents to update these documents in your organization's Document Register.
  1. (Optional) Transmit the document(s) to send them to other organizations.